1914 – joining the ANZAC army
The 10th Battalion was among the first infantry units of the Australian and New Zealand Army Corps (“ANZAC”) raised for the AIF during the First World War. The battalion was recruited in South Australia, and together with the 9th, 11th and 12th Battalions, formed the 3rd Brigade.
Barrowsgate – James Hugh Smythe (“Jim”) – left Pinnaroo and enlisted in “B” Company of the 10th Infantry Battalion on 02 September 1914 at Morphettville, near Adelaide. Prior to departure, the men of the 10th Battalion trained and drilled. Jim celebrated his 32nd birthday during this period.
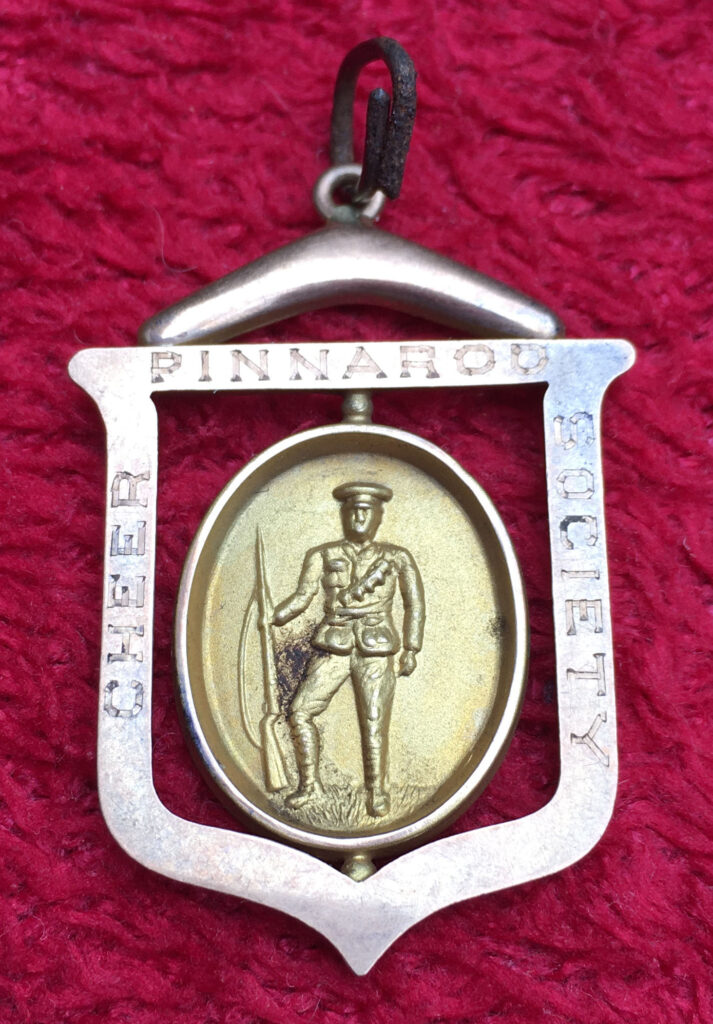
The people of Pinnaroo were very supportive of their soldiers. The “Pinnaroo Cheer Society” organised a big “send-off” for them, arranged for Christmas parcels to be sent out to the trenches in December 1917 and presented them with medals when they returned from the war in 1919.
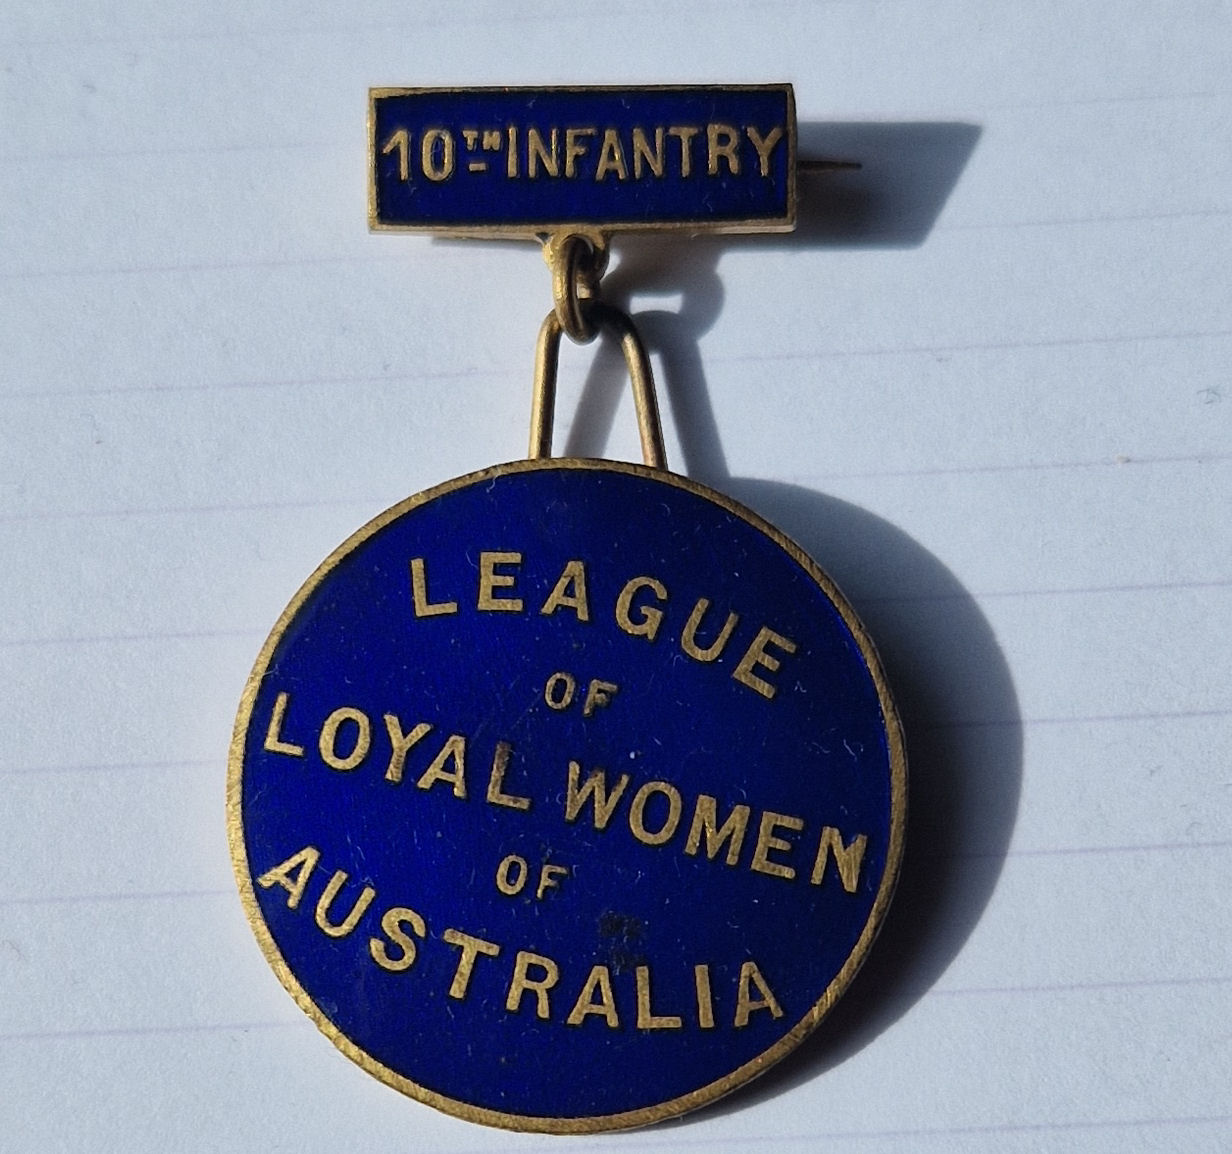
In addition, the “League of Loyal Women of Australia” carried out fundraising activities to help the men in various ways, including funding a “Trench Comforts Fund” and Christmas parcels in 1916. The League of Loyal Women was formed in South Australia on the 20 July 1915 in response to desire of many Australians to aid the troops on the front lines in any way they could. The League of Loyal Women was primarily designed to mobilise the domestic skills of women to provide men fighting overseas with ‘homely comforts’. Founded by Lady Galway, volunteers consisted mostly of middle class women who helped host fundraisers, organise donations and hold sewing circles. In 1916 the League of Loyal Women helped to found the Australian Comforts Fund (ACF), which was designed to combine the fundraising efforts of numerous groups across the country. The ACF provided soldiers on the front lines with home made goods, ‘comforts’ and hot coffee or cocoa, free of charge. The efforts of the ACF were greatly appreciated by Australian soldiers who enjoyed the free access to hot drinks and food, as well as cigarettes and socks, which resulted in Australian soldiers being among the least likely to suffer from ‘trench foot’.
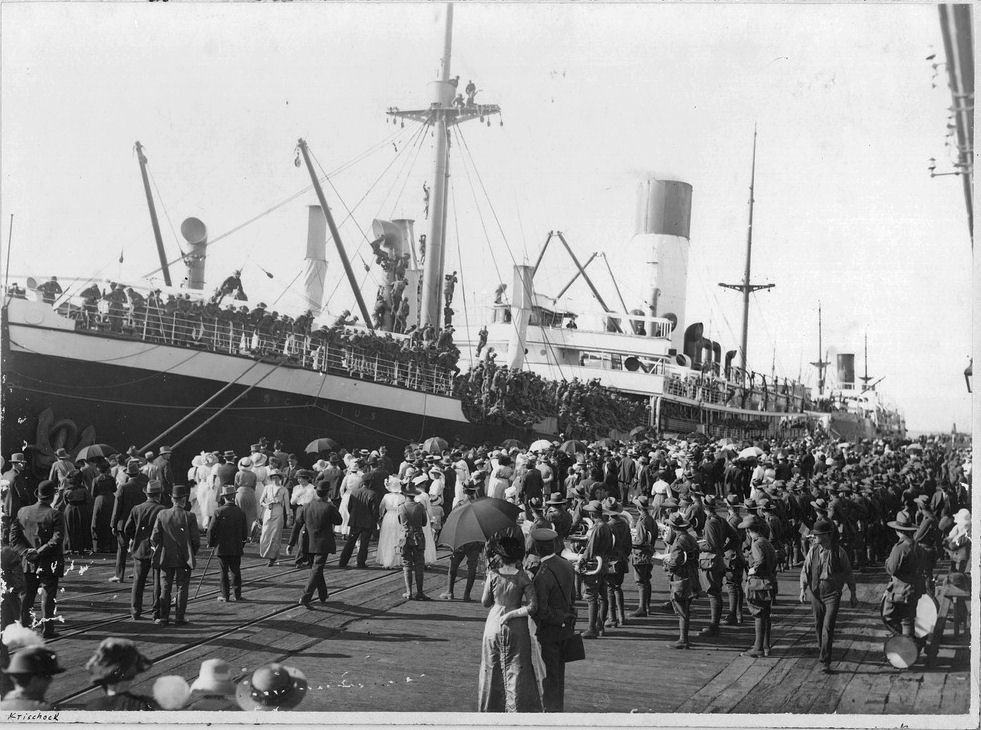
The 10th Battalion sailed out on 20 October 1914 aboard HMAT Ascanius.
The men assumed that they would be heading for Europe and the Western Front. Instead, the AIF disembarked at Alexandria on 3 December 1914, and the men moved to training camps near Cairo.
In Egypt, the AIF and the New Zealand Expeditionary Force (NZEF) formed one Corps — the Australian and New Zealand Army Corps (ANZAC) — commanded by Lieutenant-General Sir William Birdwood.
Until March 1915, the troops trained in the desert at Serapeum near the pyramids at Giza.
Back row L-R: Jim Smythe, Martin Christopherson, Allen Reed, William Westbury
Front Row: Fred E Chapman, Les Harding, Percy Venning.
Note: Although from Pinnaroo, Fred Chapman was actually in 12th Battalion.
The Gallipoli Campaign
The Gallipoli Campaign was fought in 1915 between the Ottoman Empire backed by their German ally, and the western powers of France and Britain in support of their Russian ally. The campaign took place on the Gallipoli peninsula of Turkey that forms the northern bank of the Dardanelles, a strategic strait and sea route between the Mediterranean and Black Seas, and close to the Ottoman (Turkish) capital of Constantinople (Istanbul). The strait was controlled by the Turks, and while neutral, supplies could be sent from the Mediterranean to the Russians in the Black Sea, but even prior to Turkey entering the war on 29 October 1914 the straits were being mined and when the Russians requested assistance in early January 1915 to resist the Ottoman attack in the Caucuses, a demonstration of force was planned. Winston Churchill, First Sea Lord of the Admiralty proposed a naval bombardment supported by a limited number of occupation troops to seize the forts and thereby control the straits.
Naval bombardment commenced on 19 February 1915 by a combined Anglo-French task force and the outer forts were soon put out of action, but Turkish mobility thwarted any significant breakthrough and increased military effort was therefore required. The main naval attack started on 18 March with a fleet of 18 battleships supported by cruisers and destroyers. Despite the presence of minesweepers many of the ships hit mines and sank, including the French battleship Bouvet with 600 men aboard. The fleet had to withdraw, and with it went Churchill’s plan to take the Dardanelles with limited numbers of troops. Planning now turned to the use of a significant amount of ground forces, tasked with eliminating the mobile Turkish gun batteries to enable the minesweepers to clear the straits.
The British Secretary of State for War, Lord Kitchener, appointed General Sir Ian Hamilton to command the 78,000-strong Mediterranean Expeditionary Force to carry out the mission. Soldiers from the AIF and New Zealand Expeditionary Force were encamped in Egypt, undergoing training prior to being sent to France. These troops were formed into the Australian and New Zealand Army Corps (ANZAC) under the command of Lieutenant General William Birdwood. The ANZAC troops, along with the regular British 29th Division, the Royal Naval Division and the French Oriental Expeditionary Corps, were subsequently placed under Hamilton’s command. With only five divisions the operation would be complicated by the limited forces available, the rugged terrain of the peninsula, the small number of suitable landing beaches, as well as severe logistical difficulties. In addition allied intelligence failed adequately to prepare for the campaign.
1915
The Mediterranean Expeditionary Force included British, French, British-Indian Army, New Zealand and Australian units. They gathered on the Greek island of Lemnos, 100km south-west of Gallipoli, in early April 1915. In Mudros harbour, the Australian men and some of their officers practised beach landings as they waited for the Gallipoli Campaign to begin.
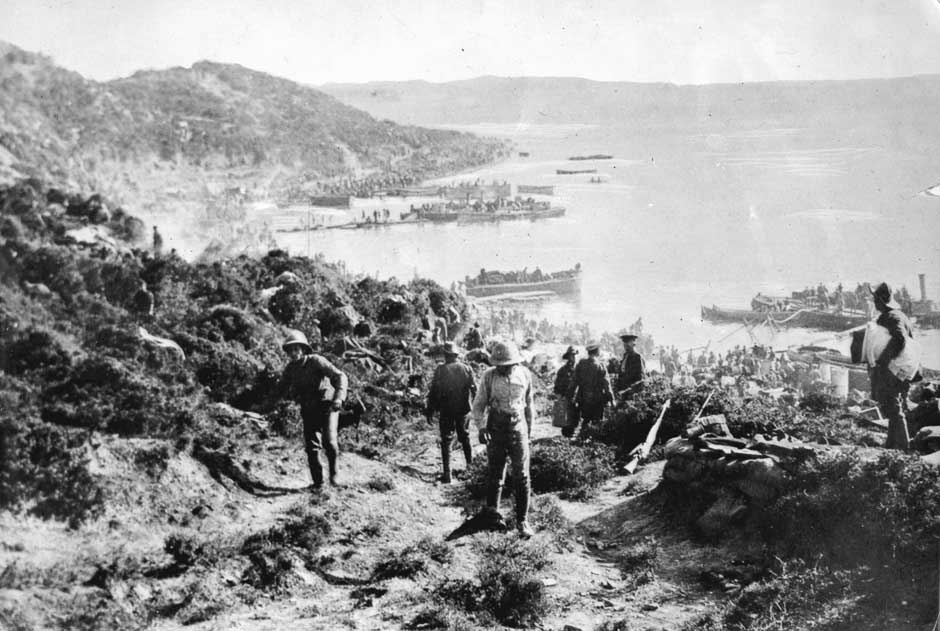
On the afternoon of 24 April 1915, the AIF men boarded troop transports, destroyers and battleships for a short overnight trip to Gallipoli. The landing at Gallipoli started on 25 April and the initial fighting lasted 9 days. There were heavy casualties on the first day and during the Turkish counter-attacks.
After they came ashore, the men occupied the beach and a small inland area of cliffs and gullies. Their tasks were to:
- Capture the high ground to the north (which they never achieved)
- Dig trenches and dugouts into the hills for shelter
- Haul supplies and equipment
- Land the pack animals
- Send wounded men back to the ships
- Set up condensers to provide fresh water
- Set up headquarters
- Set up medical facilities
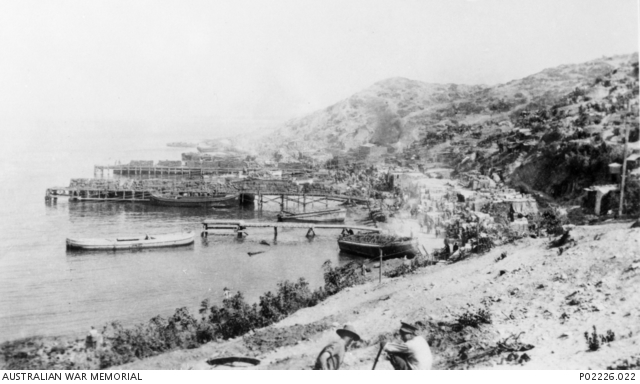
The British 29th Division landed on the tip of the peninsula at Helles, whereas the ANZACs, spearheaded by the 3rd Infantry Brigade, landed at a small cove on the Aegean coast north of Gaba Tepe, soon to be known as ‘ANZAC Cove’.
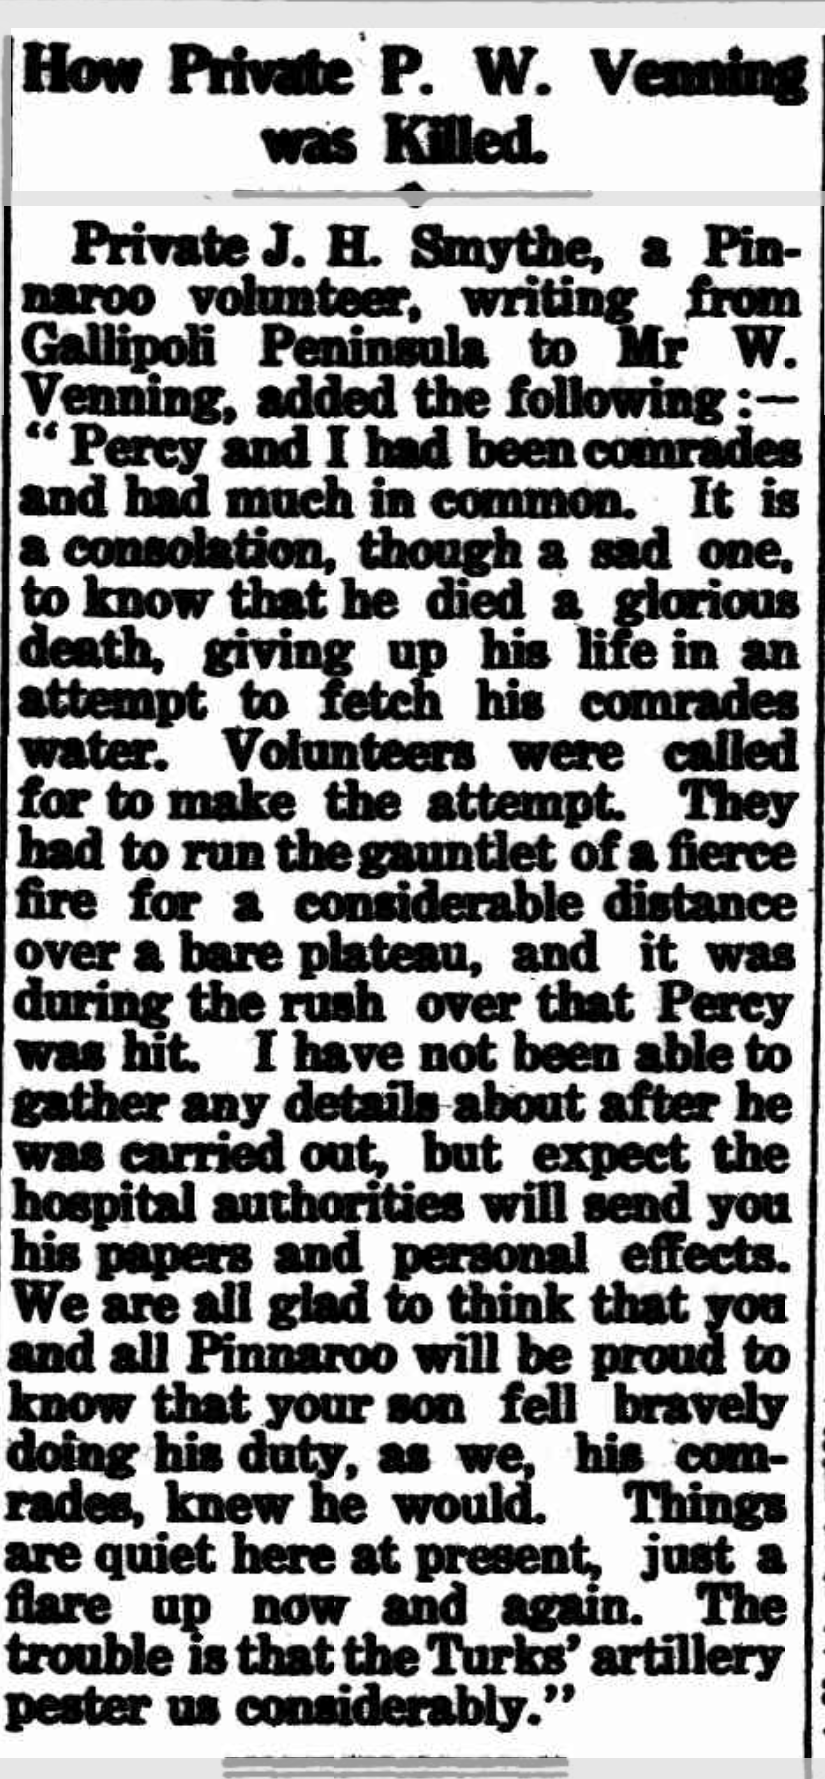
In the early days of the assault, Jim witnessed the death of Private Percy Venning, one of his comrades, with whom he had enlisted (see pyramids photo above). It was later reported in the Australian press that Jim had written to Venning’s father to inform them of the circumstances of his death..
A new landing at Suvla Bay took place on the night of 6 August against light opposition, but the British failed to push for an advance inland, and ground not much more than the beach was seized, reducing the Suvla front as well to static trench warfare.
In August 1915, at ANZAC Cove an attack on the Ottoman trenches at “Lone Pine”, led by the 1st Infantry Brigade (with the 3rd Brigade in support), captured the main Ottoman trench line in a diversion to draw Ottoman forces away from the main assaults at the peaks of Chunuk Bair and Hill 971, but both of these main attacks failed in their objectives.
10th Infantry Battalion at the Gallipoli landings
On 24 April 1915, 10th Battalion sailed from Mudros harbour on the transport ship Ionian and transferred to HMS Prince of Wales.
The battalion then transferred to cutter boats which were towed to within 50 yards of shore by steamers. The lifeboats were rowed to shore for disembarkation at ANZAC beach, reaching it as dawn was breaking around 4:15am. As they arrived, they were fired at from the hill above the shore. Soldiers had to wade through 3 ft of water onto the pebbly beach. 9th, 10th and 11th Battalions were all mixed up on the beach but under a hail of gunfire, could not be re-organised at first. The men were ordered to charge up the hill and they drove off the Turks. By about 0830, they had pushed about a mile inland up the hill. After attempting to continue, the ANZACs dug in on “Shrapnel Hill”, where they then re-organised back into Companies. By 29 April, the men were exhausted, having endured 96 hours of relentless fighting in the trenches.
About 2,300 Australians had been killed on Gallipoli by 3 May. Conditions at Gallipoli grew worse for the soldiers on both sides, and summer heat and poor sanitation resulted in an explosion in the fly population. In June 1915, during a slight lull in the fighting, Jim wrote a letter home which his father had published in The Aberdeen Evening Express on 23 July 1915.
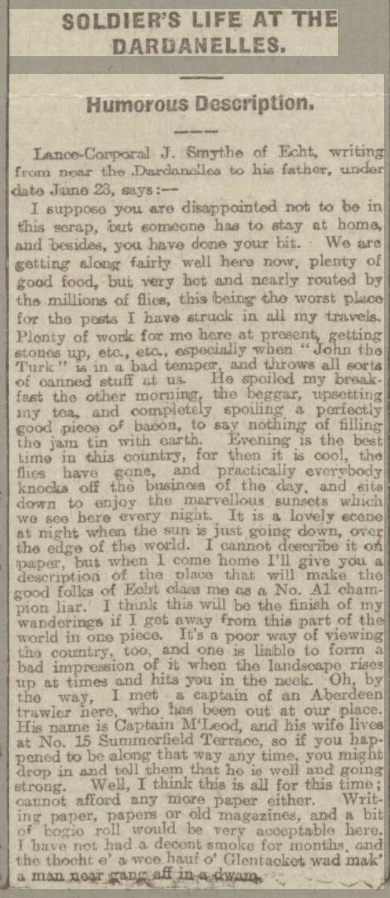
It is notable that his first experiences of war had already made Jim voice the opinion that “this will be the finish of my wanderings if I get away from this part of the world in one piece”. Not long after writing this letter, Jim himself was wounded on 07 August 1915. A comrade Allen Reed (pictured in the pyramids photo above) wrote to his local paper saying that Bill Westbury (also pictured above) had returned to Gallipoli and that Jim had had a “remarkable escape”.
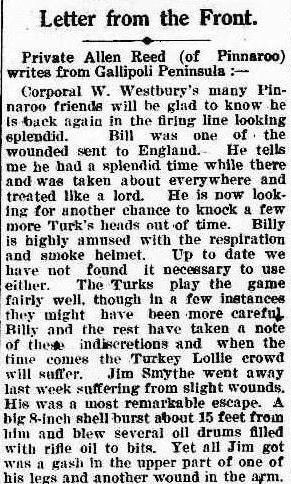
Jim was evacuated to hospital in Cairo for three weeks, before returning to the front on 16 September, being simultaneously promoted to Corporal.
Eating became extremely difficult for the soldiers as unburied corpses became bloated and putrid. The precarious Allied bases were poorly situated, which caused supply and shelter problems. A dysentery epidemic spread through the Allied trenches at ANZAC and Helles, while the Ottomans also suffered heavily from disease which resulted in many deaths. Kitchener visited the eastern Mediterranean in early November and after consulting with the commanders agreed with the recommendation for evacuation.
The evacuation was the best-executed aspect of the entire Dardanelles campaign, and at the end of the entire operation 142,000 men were evacuated with negligible casualties.
When the last of the British forces left Cape Helles on 8 January 1916, the unsuccessful Gallipoli Campaign was over.
The AIF experienced casualties of nearly half the men who served at Gallipoli in 8 months — more than 8,100 died and some 26,000 were wounded.
James Hugh Smythe timeline (1915, Gallipoli)
Role/Rank: Infantryman – Private
| Date | Location | Description |
| 25 April 1915 | Gallipoli peninsula | Landed on ANZAC beach. 10th Battalion were in the first landings and were immediately under fire. |
| 28 April 1915 | Gallipoli – Shrapnel Ridge | After four days of fighting, 10th Battalion were relieved by the Royal Marine Light Infantry. |
| May to July 1915 | Gallipoli – Shrapnel Gully/Shrapnel Ridge | Trench warfare |
| 7 August 1915 | Gallipoli – Lone Pine Ridge | Injured during the Battle of Lone Pine by machine gun fire. 10th Battalion was supporting the attack by 1st Infantry Brigade. |
| 7 August 1915 | Transit (ship) | To Mudros |
| 7 August 1915 | Transit (ship) | Hospital ship HMHS Caledonia to Alexandria |
| 10 August to 3 September 1915 | No. 3 Auxiliary Hospital, Heliopolis, near Cairo, Egypt | Treatment and recuperation. (Gunshot wounds to side, shoulder and thigh, shell shock) |
| 3 September 1915 | Transit (ship) | Returned by SS Ionian to Gallipoli peninsula |
| 16 September 1915 | Gallipoli peninsula | Promoted to Corporal. It is likely that James Smythe transferred from “B” Company to “C” Company at this time. |
| 7 October 1915 | Gallipoli peninsula | Jim’s 33rd birthday |
| September to November 1915 | Gallipoli peninsula | Trench warfare |
| 21 November 1915 | Transit (ship) | 10th Battalion evacuates to Mudros, Lemnos |
| December 1915 | Mudros | Recuperation and training |
| 07 December 1915 | Mudros | J H Smythe promoted to temporary Sergeant Cook |
| 29 December 1915 | Transit (ship) | 10th Battalion sails to Alexandria, Egypt on HMAT Seeangbee |
The Middle East campaigns
After British forces withdrew from Gallipoli, thousands of Turkish troops were freed up to fight in other campaigns. The British worried about the threat to its protectorate, the Sultanate of Egypt, and the Suez Canal. This shipping route was vital to the British Empire’s war effort.
The AIF returned to Egypt from Gallipoli with the Mediterranean Expeditionary Force. General Archibald Murray became commander of the force in January 1916. He was charged with the defence of the Suez Canal against Turkish attacks.
James Hugh Smythe timeline (1916, Egypt)
Role/Rank: Sergeant Cook
| Date | Location | Description |
| January 1916 | Tel-El-Kebir Camp, 30 miles West of the Suez Canal | Training |
| 7 January 1916 | Tel-El-Kebir Camp | Promoted to Sergeant Cook (permanent) |
| 25 January 1916 | Transit (rail) | To Serapeum |
| February 1916 to March 1916 | Serapeum Camp, Ismailia, adjacent to the Suez Canal | Training and guarding the Suez canal |
| 26 March 1916 | Transit (rail) | To Alexandria |
| 28 March 1916 | Transit (Ship) | Embarked on SS Saxonia to Marseilles |
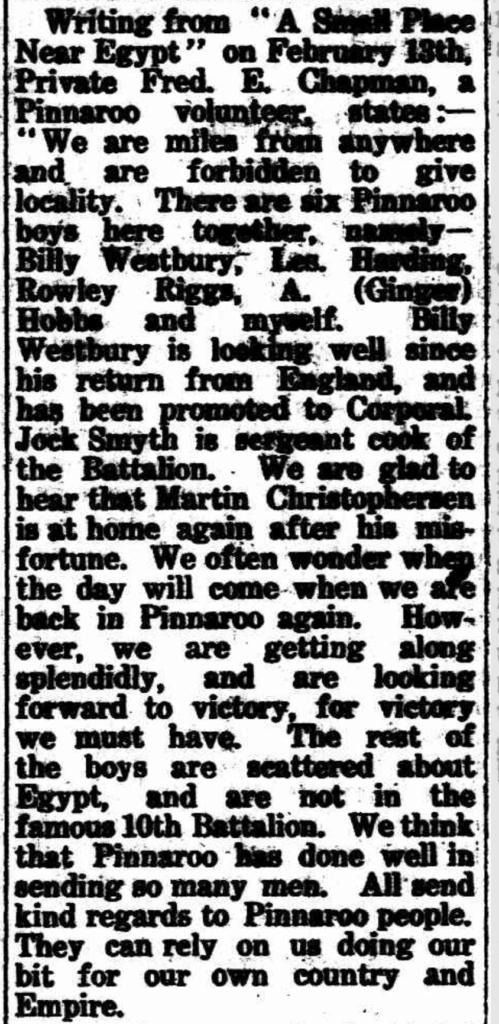
As noted above, Jim had been promoted to the role of Sergeant Cook. His colleague from Pinnaroo, Fred Chapman had written home in February with news about the Pinnaroo boys.
The Western Front
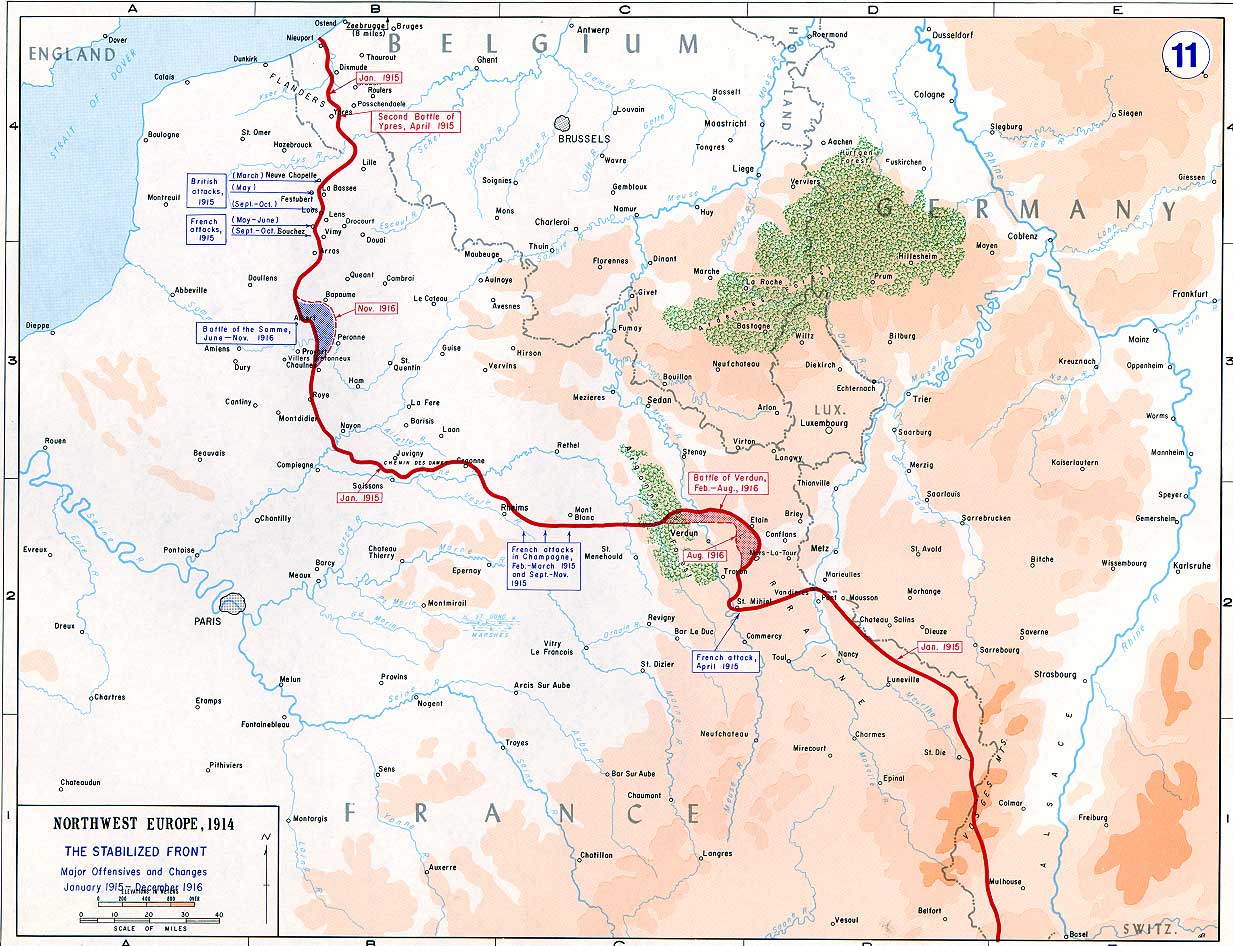
In August 1914, the Germans had marched through Belgium into France. Fierce resistance from the British and French stopped them from moving further into France. However, the Allies were unable to drive the Germans back. By Christmas 1914, there was a deadlock. The Germans and the Allies faced each other across a line of trenches that stretched from Ostend on the Belgian coast in a south-easterly direction to the Swiss border (more than 600km).
After the initial German invasion of 1914, the two opposing forces had settled into a network of trenches and defensive systems that stretched from English Channel to the Swiss border.
1916
After the evacuation of Gallipoli, the AIF regrouped and retrained in Egypt before most were sent to the Western Front. It was felt that the increase in troop numbers could help win against the German Forces on the Western Front.
In March 1916, the 10th Battalion sailed for France, arriving in Marseille. 10th Battalion had been split, with half of the men leaving to form the 50th Battalion.
The AIF men were fit and keen. They were eager to prove themselves worthy of the ANZACs’ reputation for bravery and initiative.
James Smythe’s two years on the Western Front were divided between Flanders (around Ypres) and the Somme Valley (around Albert).
In early April, 10th Battalion travelled by train from the port of Marseilles to Godewaersvelde, about 10 miles WSW of Ypres. A soldier’s life behind the front lines in France was easier than in Egypt. Cafes in villages sold eggs, chips, beer and wine. However, billets were often basic, such as a barn, loft or stable.
The Australians settled into training. They learned about trench warfare in ‘the nursery’, a section of trenches around Armentières. Living on the front line involved occasional shelling, raids, sniping and trench routine (the learned behaviours that helped men to survive).
James Hugh Smythe timeline (Spring 1916, Flanders)
Role/Rank: Sergeant Cook
| Date | Location | Description |
| 2 April 1916 | Transit (ship) | 10th Battalion arrives in Marseilles on SS Saxonia |
| 5 April | Transit (train) | To Goewaersvelde (Flanders) |
| 6 April 1916 | Moolenacker Camp (Strazeele) – “Nursery sector” | Training in trench warfare |
| 20 April | Transit (foot) | To Brigade HQ near Sailly sur la Lys |
Jim’s role as a Sergeant Cook was not just to prepare and cook food for the Battalion, but also to distribute it to the forward lines. This would have involved carrying hot food and drink through the trenches to the soldiers at the front and setting up a station there to distribute it.
The fighting resumes for 10th Battalion
10TH BATTALION WAR DIARY 19 MAY 1916
“At 2000 the enemy suddenly opened up a heavy shell attack on our billets in the vicinity of ROUGE DE BOUT.”
James Hugh Smythe timeline (Spring 1916, Flanders)
Role/Rank: Sergeant Cook
| Date | Location | Description |
| 19 May | Rouge De Bout (near Fromelles) | Billets attacked by German bombardment |
| 6 June 1916 | Petillon (Fleurbaix), just SW of Armentieres | 10th Battalion moved into the front line |
| 11 July | Transit (train) | Train from Godewaersvelde to Doullens near the Somme |
The Allied offensive, 1916
Background
Towards the end of 1915, a combined Franco-British offensive at the place where the two armies met either side of the Somme river was being proposed by the Commander-in-Chief of the French Armies, General Joseph Joffre. Following the major German offensive against the French Army at Verdun in February pressure soon increased on British Commander-in-Chief Sir Douglas Haig to mount this large-scale operation to help relieve pressure on the besieged French at Verdun, as well as taking the lead as the French had to reduce their participation to a supporting role in the Somme operation as a result of the German attack. Haig’s intention was to burst right through the German defences, sending his cavalry on to Bapaume, and rolling up the entire German position on the Western Front.
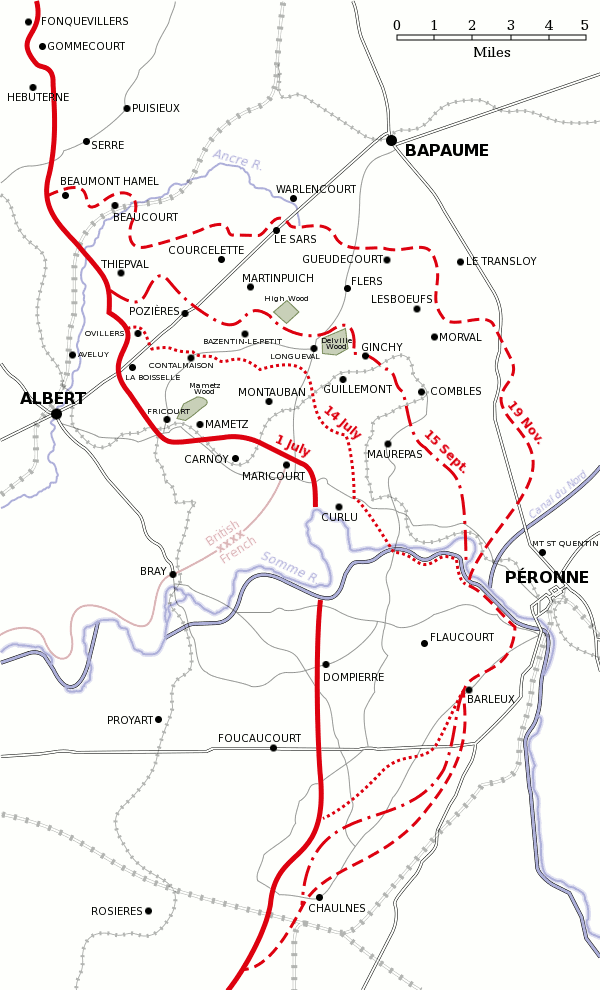
The Somme Offensive was a series of bloody battles that continued for almost 5 months and caused more than 1 million causalities.
The First Battle of the Somme began on 1 July 1916, and the Australians were committed to action within 3 weeks. Men from 1 ANZAC Corps (including the 10th Battalion) served in the British Reserve Army (later called the 5th Army) from 23 July, commanded by General Hubert Gough.
Many Australians died in an ill-conceived attack at Fromelles. In a single night, on 19 to 20 July 1916, the 5th Division suffered more than 5,500 casualties and no ground was taken.
Pozières
In the original Somme battle plans, a confident General Haig had advocated taking the second line German defensive system that ran through Pozières on the first day. General Rawlinson, anticipating strong German defence, was more cautious and indeed it was only to the East of the battle that the first line was breached. Further progress was made during the second general offensive on the 14 July where the second line was breached to the south of the Albert – Bapaume road. The village and ridge at Pozières now stood a key obstacle to the British advance, and General Gough’s Reserve Army, originally to be used to push through to Bapaume was tasked to take Pozières and turn north to outflank the German stronghold at Thiepval and the surrounding area that had thus far repulsed the British attacks. Following their move south from the Fleurbaix sector, the 1st (including the 10th Battalion), 2nd and 4th Australian Divisions of 1 ANZAC Corps were now assigned to Gough’s Reserve Army for the attack on Pozières.

On the 19 July the systematic bombardment of Pozières by heavy artillery began in preparation for the assault by the 1st Australian Division, the targets being roads and barricades, and two days later the houses, trenches and strong-points within the village.
Just after midnight on the 23 July 1916, men and officers in the first wave, with the 1st Brigade on the left and the 3rd Brigade (including 10th Battalion) on the right crept forward from their jumping-off trenches in order to approach the German position before the final bombardment began. At 12:28 the 1st Division’s field artillery burst on the enemy trench immediately in front of the crouching infantry. At 12:30 the 1st Division guns lifted their fire to the line of the orchards and the infantry rushed for Pozières Trench (running east -west south of the village) which was taken with little opposition, and the second line passed through the men of the first and lay up near the barrage ready to assault the second objective along the back hedges of the village. Only on the extreme right in the Old German (“OG”) Lines did the first attack meet with heavy resistance. By 2:30 along the whole length of the village a new front line was being dug parallel and close to the Bapaume Road, to entrench themselves by day-break. The objectives in Pozières had thus been taken without much resistance from the enemy, but in the OG Lines to the east the attack had been much more stubbornly opposed and was stopped 600 yards short of its objectives. For the Australians they had achieved their first victory of importance on the Western Front and their reputation, begun in Gallipoli, took hold in Europe. They made 19 attacks over 45 days and captured vital ground, but some 23,000 AIF men were killed or wounded.
James Hugh Smythe timeline (Summer 1916, The Somme)
Role/Rank: Sergeant Cook
| Date | Location | Description |
| 12-19 July | Transit | Route marched to Albert via Candas, Montrelet, Canaples, Halloy, Naours, Herissart and Forceville |
| 20 July 1916 – | Transit | Route marched to “Sausage Valley” near Pozières |
| 22 July – | Pozières | The First Battle of Pozières |
| 25 July | Rotation | 10th Battalion relieved from front line and retired to Berteaucourt HQ |
| 1 to 9 Aug 1916 | Berteaucourt | Billeted |
| 7 August 1916 | Berteaucourt | Promoted to Warrant Officer – Regimental Quartermaster Sergeant (2nd Class) |
| 19 to 23 August 1916 | Pozières | The Second Battle of Pozières – supporting a push forward to Mouquet Farm. Although the Farm was not taken, much ground was gained. |
| 23 August 1916 | Transit (train) | From Doullens to Proven (near Ypres) |
Jim’s new role as Quartermaster Sergeant (i.e. senior assistant to the Battalion Quartermaster) was essentially to ensure that the personnel of the Battalion were fed, clothed and appropriately equipped at all times.
10th Battalion’s brief return to Flanders
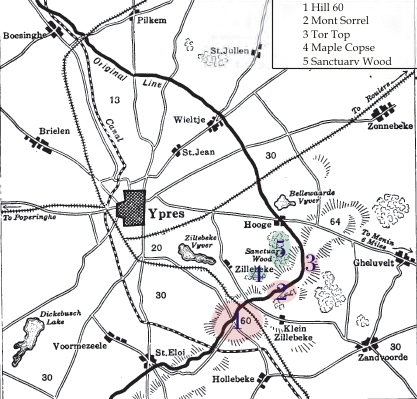
After the stress of Pozières, the 10th Battalion returned to Flanders, partly for rest, recuperation and training but they were also at times holding the front line at Hill 60, SE of Ypres.
James Hugh Smythe timeline (Autumn 1916, Flanders)
Role/Rank: Warrant Officer – Regimental Quartermaster Sergeant (2nd Class)
| Date | Location | Description |
| 1 Sep 1916 | Poperinghe Camp | Billeted, training |
| 24 Sep 1916 | Ypres | Allies attempted to re-capture Hill 60 with 10th Battalion in supporting role |
| 7 October 1916 | Halifax Camp, near Ypres | Jim’s 34th birthday (not fighting – possibly on leave). |
| Early October 1916 | Transit | Route marched west to Tournehem then to Arduicq whence they entrained to Pont Remy in the Somme Valley |
The 10th Battalion’s role in the Somme 1916/1917 Winter offensive
After their brief period back in Flanders, in October 1916, the 10th Battalion returned again to the Somme, where they were to remain until the end of July 1917. The objective was to continue to push back the German line around Thiepval.
James Hugh Smythe timeline (Winter 1916/1917, The Somme)
Role/Rank: Warrant Officer – Regimental Quartermaster Sergeant (2nd Class)
| Date | Location | Description |
| 21 October 1916 | Transit | Battalion marched via Buigny-l’Abbe to Fricourt |
| 30 October | Transit | Route marched to Bernafay Wood |
| 6-11 November 1916 | Gueudecourt | Trench warfare (on the frontline) |
| 11 November – 12 December 1916 | Transit/rotation | Route marched to billets at Dernancourt |
| 12-22 December 1916 | Flers | Trench warfare (on the frontline) |
During November and December 1916, the Battalion was engaged in trench warfare, on and off but the main enemy was the weather.
1916 was devastating for Australian families. Over 10,000 AIF men died on the Western Front by the end of the year, and 30,000 had been wounded.
Those who survived the battles of Fromelles or Pozières, or served through the winter on the Somme, could never forget the horrors and suffering they endured.
1917
The Australian troops experienced a bitterly cruel winter in the trenches after the Somme Offensive. In the first half of the year, the AIF’s heaviest fighting took place in France, at Bullecourt.
All armies were struck with disease outbreaks in the extremely cold months of January and February — especially respiratory illness (e.g. colds, bronchitis) and rheumatism.
1 ANZAC Corps helped to patrol the front over winter. The men noticed the Germans withdrawing to the newly constructed Hindenburg Line. The Australians soon realised the enemy had retreated to this heavily fortified and strongly defended position.
The 2nd and 5th Divisions helped to capture German-held villages between Bapaume and the Hindenburg Line. This involved some heavy fighting across open fields. By 9 April, the British and Australian forces had reached the Hindenburg Line outposts outside Bapaume and were facing the Germans at Bullecourt. Heavy fighting followed but the front barely moved in this area until 1918.
James Hugh Smythe timeline (Spring 1917, The Somme)
Role/Rank: Warrant Officer – Regimental Quartermaster Sergeant (2nd Class)
| Date | Location | Description |
| 1 to 7 March 1917 | Dernancourt | Training |
| 8 to end March 1917 | Shelter Wood Camp | Mostly training |
| 7 April 1917 | Louverval | 10th Battalion in the front line |
| 10 April 1917 | Boursies | Front line pushed out |
| 11 April 1917 | Bancourt | 10th Battalion relieved and fall back |
1917 saw more bitter fighting. A further 76,000 Australians became casualties in battles at Bullecourt, Messines and the four-month campaign of the 3rd battle of Ypres, commonly known as the Battle of Passchendaele. At year’s end the five Australian divisions were organised into the Australian Corps and spent the winter of 1917-1918 in Belgium.
The Second Battle of Bullecourt began on 3 May. The 1st Australian Division suffered heavy losses to capture a section of the German line. They held on for 5 days until they were relieved by the 5th Division. On 15 May, the Australians withstood one last heavy counter-attack before the Germans gave up the ground. In 2 weeks, the AIF suffered more than 7,000 casualties.
The grand scheme for the major British offensive at Arras failed. The French army was seriously weakened after its own failed offensive, known as the Nivelle Offensive, and the Allies were in crisis. The British forces were still capable of attacking on the Western Front, while the French were compelled to go on the defensive.
James Hugh Smythe timeline (Spring/Summer 1917, The Somme)
Role/Rank: Warrant Officer – Regimental Quartermaster Sergeant (2nd Class)
| Date | Location | Description |
| 4 to 9 May 1917 | Bullecourt | Fighting on the frontline – retook Bullecourt from the Germans but the attack then stalled |
| 10 May – end June 1917 | Ribemont and nearby (Mailly Maillet) | Rest and recuperation |
| 08 July 1917 | Pozières | A memorial cross was erected to those in the Battalion killed and injured at Pozières. This was later relocated to Adelaide. |
| 12 July 1917 | Pozières | The 10th Battalion were inspected by the King |
| 12-26 July 1917 | Transit/Scotland | Two weeks’ leave to get married (16 July) in Scotland. Jim was aged 34 and Janet was 28. |
| 26 July 1917 | Transit (boat/train) | Re-joined 10th Battalion at Albert |
| 26 July 1917 | Transit (train) | Entrained to Steenbeque (Flanders) |
The Flanders offensive
The British Commander General Douglas Haig now turned his attention again to Belgium.
The Battle of Messines was a prelude to the much larger Third Battle of Ypres − better known as Passchendaele − which began on 31 July 1917.
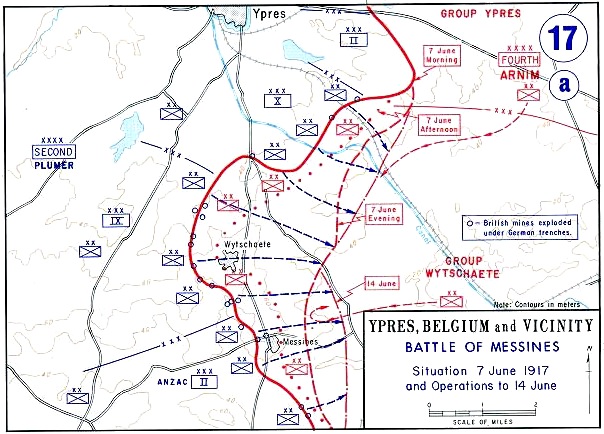
Since November 1916, the 1st Australian Tunnelling Company protected and worked on British tunnels south of Ypres beneath Hill 60. The galleries reached under the German line and were packed with tonnes of explosives.
In contrast to the eventual disaster at Passchendaele, the carefully prepared attack on Messines was a striking success. On 7 June, the Battle of Messines began when 19 mines exploded under the German lines, including at Hill 60. The explosions shocked and demoralised the German troops, killing and wounding up to 10,000 and leading thousands more to surrender.., The 3rd Australian Division seized the enemy front line near Messines within minutes.
Messines was the first time Australian troops encountered the concrete blockhouses dubbed ‘pillboxes’. Learning how to capture a German pillbox became a feature of fighting outside Ypres.
In the second half of the year, the AIF suffered terrible losses in Flanders.
The Third Battle of Ypres began with encouraging gains but terrible summer weather soon bogged it down. By August the offensive was clearly failing in its objectives and had descended into attritional fighting. New techniques by both sides led to agonisingly slow forward movement for the British, at enormous cost in casualties. Bad weather in October led to the battlefield becoming an impossible quagmire.
The Third Battle of Ypres, 1917
The AIF men served in a series of ‘bite and hold’ battles at Menin Road, Polygon Wood and Broodseinde. The victory at Menin Road demonstrated the outstanding qualities of the Australians in the 1st and 2nd Australian Divisions. The Battle of Broodseinde was dubbed one of the AIF’s greatest victories.
Then followed heavy rain and two doomed attacks in the muddy quagmire – at Poelcappelle and Passchendaele. The objective was to push forward to the top of a hill at Passchendaele which had given the Germans sight lines over the village of Ypres but it became impossible to move the artillery forward to cover the advancing infantry. The Germans had built a series of concrete pill boxes, which gave them shelter from which to pick off the advancing infantry.
Over 8 weeks, the AIF had suffered 38,000 casualties. British command eventually withdrew the Australians from the lines by 14 November and the Canadians continued the advance and eventually took the objective. The men had a chance to rest. Some lucky soldiers took leave in London or Paris.
For the men involved, 1917 began in the muddy frozen trenches of the Somme and ended in the slimy bog leading up to the Belgian village of Passchendaele.
The AIF reorganised its military structure on 1 November to form the Australian Corps. All five Australian divisions were together for the first time.
In 1917, more than 76,000 Australians became casualties on the Western Front, including some 40,000 who died.
In December 1917, Jim was “reduced to the ranks” (i.e. from Regimental Quartermaster Sergeant, he reverted to a Private Infantryman). He explained in a letter home to his mother dated 23 January 1918 that his ambition was to qualify for a Commission and, as a “non-combatant” soldier, he had to “start at the bottom again”. This also explains his spells at Brigade School in February 1918 and Corps School in March 1918.
James Hugh Smythe timeline (Autumn/Winter 1917, Flanders)
Role/Rank: Warrant Officer – Regimental Quartermaster Sergeant (2nd Class)
| Date | Location | Description |
| August and the first half of September 1917 | Flanders | Mostly training and drills around Seningham |
| 16 Sep 1917 | Transit | Route marched to Ouderdom, then Chateau Segard |
| 20 to 22 Sep 1917 | Polygon Wood | Fighting in the frontline |
| 23 Sep 1917 – | Transit | Bussed to Steinvoorde |
| 29 Sep 1917 – | Transit | Bussed back to Chateau Segard |
| 1 to 10 October 1917 | Passchendaele/Celtic Wood | Trench warfare |
| 7 October 1917 | Celtic Wood | Jim’s 35th birthday – on the frontline |
| October 1917 | Ouderdom | Rest and recuperation at Dominion/Cornwall Camps |
| 1 Nov 1917 | ANZAC ridge (Western Belgium)/Westhoek Ridge | Fighting on the frontlines |
| 11 November 1917 – | Transit | Bus to Renescure – training around the Boulogne area |
| 15 December 1917 | Transit | Train to Lindenhoek |
| 16 December 1917 | Transit | Route marched to Messines |
| 16-23 December 1917 | Messines | Fighting on the frontlines |
| 24 December 1917 | Reduced to the ranks (Private infantryman) | |
| December 1917 and January 1918 | Messines | Fighting on the frontlines (now in “D” Company) |
| February 1918 | France | Training (Brigade School) |
| 23 February 1918 | Aldershot Camp, Flanders | J H Smythe promoted to Lance Corporal |
| March 1918 | France | Training (Corps school) |
1918
The AIF was seriously low in numbers. The Australian public had voted ‘no’ to conscription in October 1916 and again December 1917. The pool of enthusiastic volunteers that had supplied the AIF in the early years had run dry.
In January, the Australian Corps had about 120,000 troops in Belgium and France. Its units included infantry, artillerymen, engineers, machine-gunners, signallers and medical personnel. Other units on the Western Front included Australians too, for example, flying squadrons, railway companies and tunnellers.
In February 1918 the Australian 3rd Brigade was training at Neuve Église , Belgium, and relieved the 4th Brigade at the front line on 1 March, in preparation for what was to become the German “Spring Offensive”. By 3 March 1918 all four Battalions (9th, 10th, 11th and 12th) of the 3rd Brigade were at Hollebeke, Belgium. Much work was needed in defensive works on the British front line: trenches drained and repaired, wiring dug in and so on.
Germany launched its Spring Offensive on 21 March 1918. It hoped to inflict a crippling blow to the Allies before the American forces built up in France. The Germans advanced quickly with 63 divisions over a front of 110km.
The German offensive, in reality a series of several offensives, lasted almost 5 months and left the Australians bitter about any German successes. The Germans drove back the British forces on the Somme and in Flanders. They retook many of the battlegrounds that had been taken by the Australians in 1916 and 1917. They also threatened vital railway and communication centres.
The 10th Battalion’s role in Spring/Summer 1918
In March and April 1918 the 10th Battalion helped slow the German spring offensive and was then involved in the operations leading up to an Allied counter-offensive.
From April to August, many troops were involved in ‘peaceful penetration raids’ to capture parts of the German line. They patrolled and raided enemy outposts and trenches, often on their own initiative.
The AIF fought many defensive battles, including those at Dernancourt, Hangard Wood, Hazebrouck, Morlancourt and Villers-Bretonneux.
The 10th battalion participated in the great allied offensive of 1918, fighting near Amiens on 8 August 1918. This advance by British and empire troops was the greatest success in a single day on the Western Front, one that German General Erich Ludendorff described as “the black day of the German Army in this war”.
In the end, the Imperial German Army over-extended itself and the Spring Offensive had failed by mid-July.
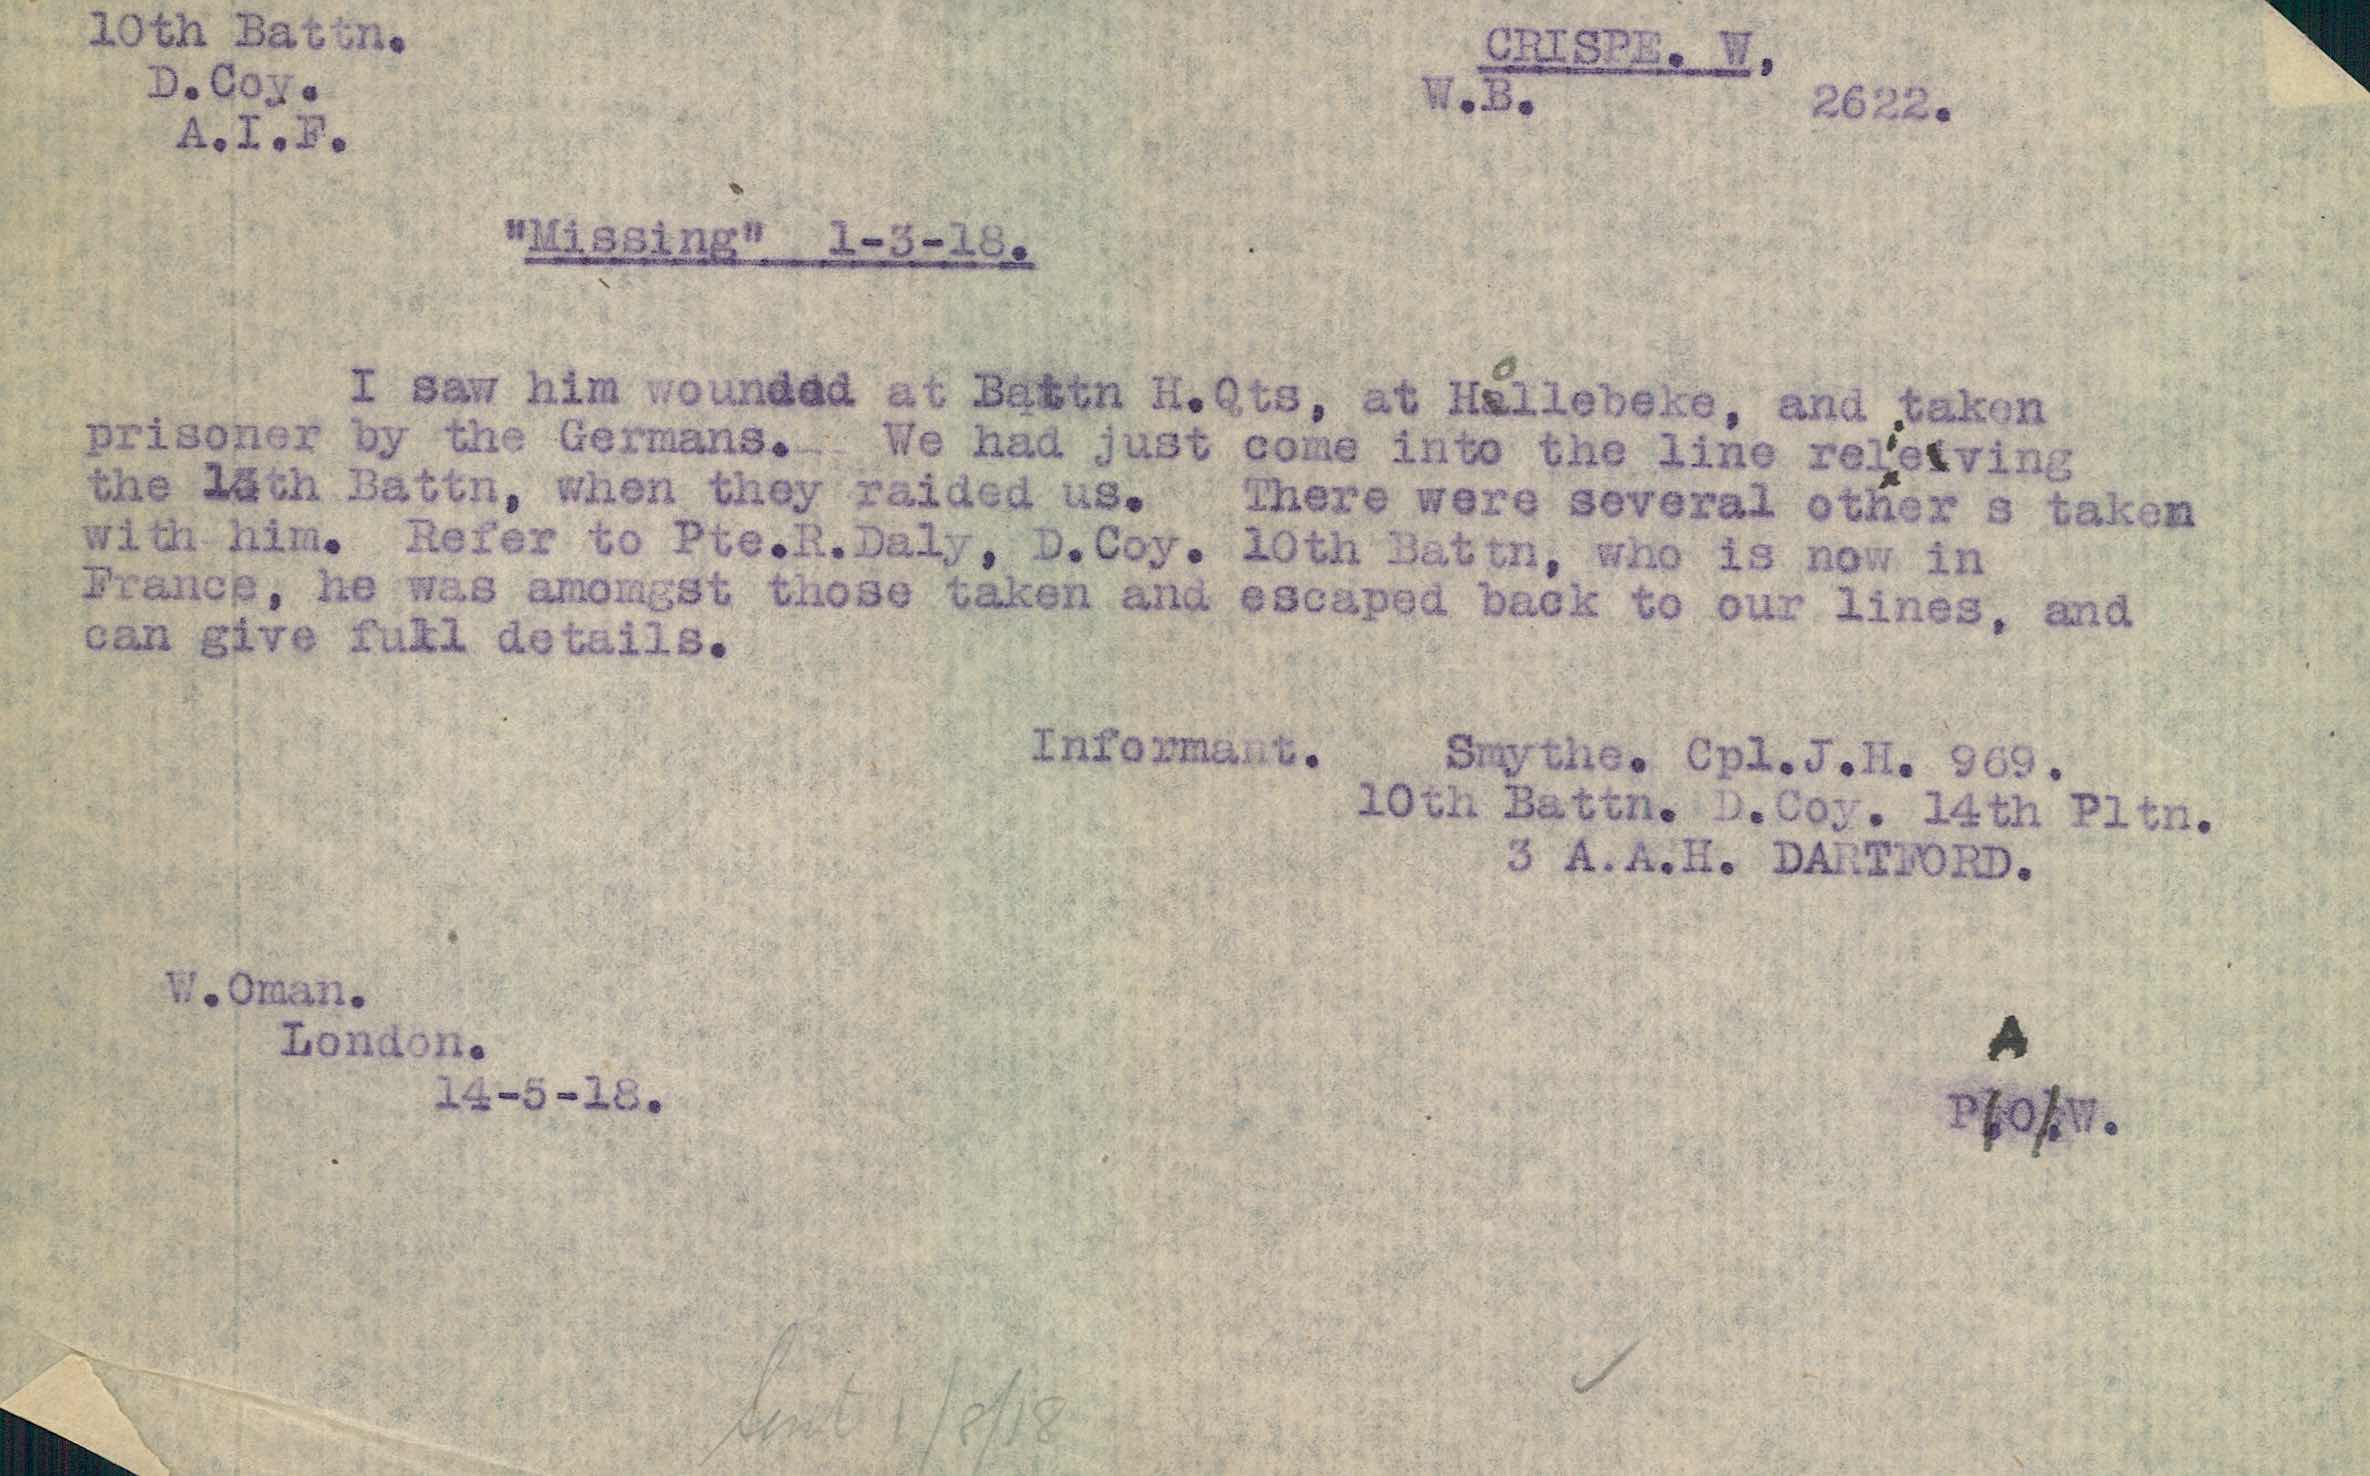
Meanwhile, in Flanders, on the night of 1/2 March 1918, “D” Company’s HQ (a pillbox) near Hollebeke was raided by around 120 Germans. They captured several soldiers from 10th Battalion including the Company Commander Major Henwood, who refused to surrender, was dragged across “no man’s land” and shot dead. As part of a Red Cross investigation into the location of one of the missing soldiers (Private Crispe), James Smythe was later interviewed and he reported that he had seen Private Crispe taken prisoner together with several others.
James Hugh Smythe timeline (Winter/Spring 1918, Flanders)
Role/Rank: Infantryman – Lance Corporal
| Date | Location | Description |
| February 1918 | Neuve-Église (NieuKirke) | In camp, preparing for German Spring Offensive |
| 20 February 1918 | Neuve-Église | Promoted to Lance Corporal |
| 1 March 1918 | Hollebeke | On the frontline. “D” Company HQ raided by Germans. James Smythe was present. |
On 13 April 1918, the 10th Battalion moved into support positions at Hazebrouk towards which the German Army was thought to be marching. On the way, they passed hordes of refugees carrying their possessions and, in some cases, animals. The Battalion collected any loose livestock and sent it to the rear.
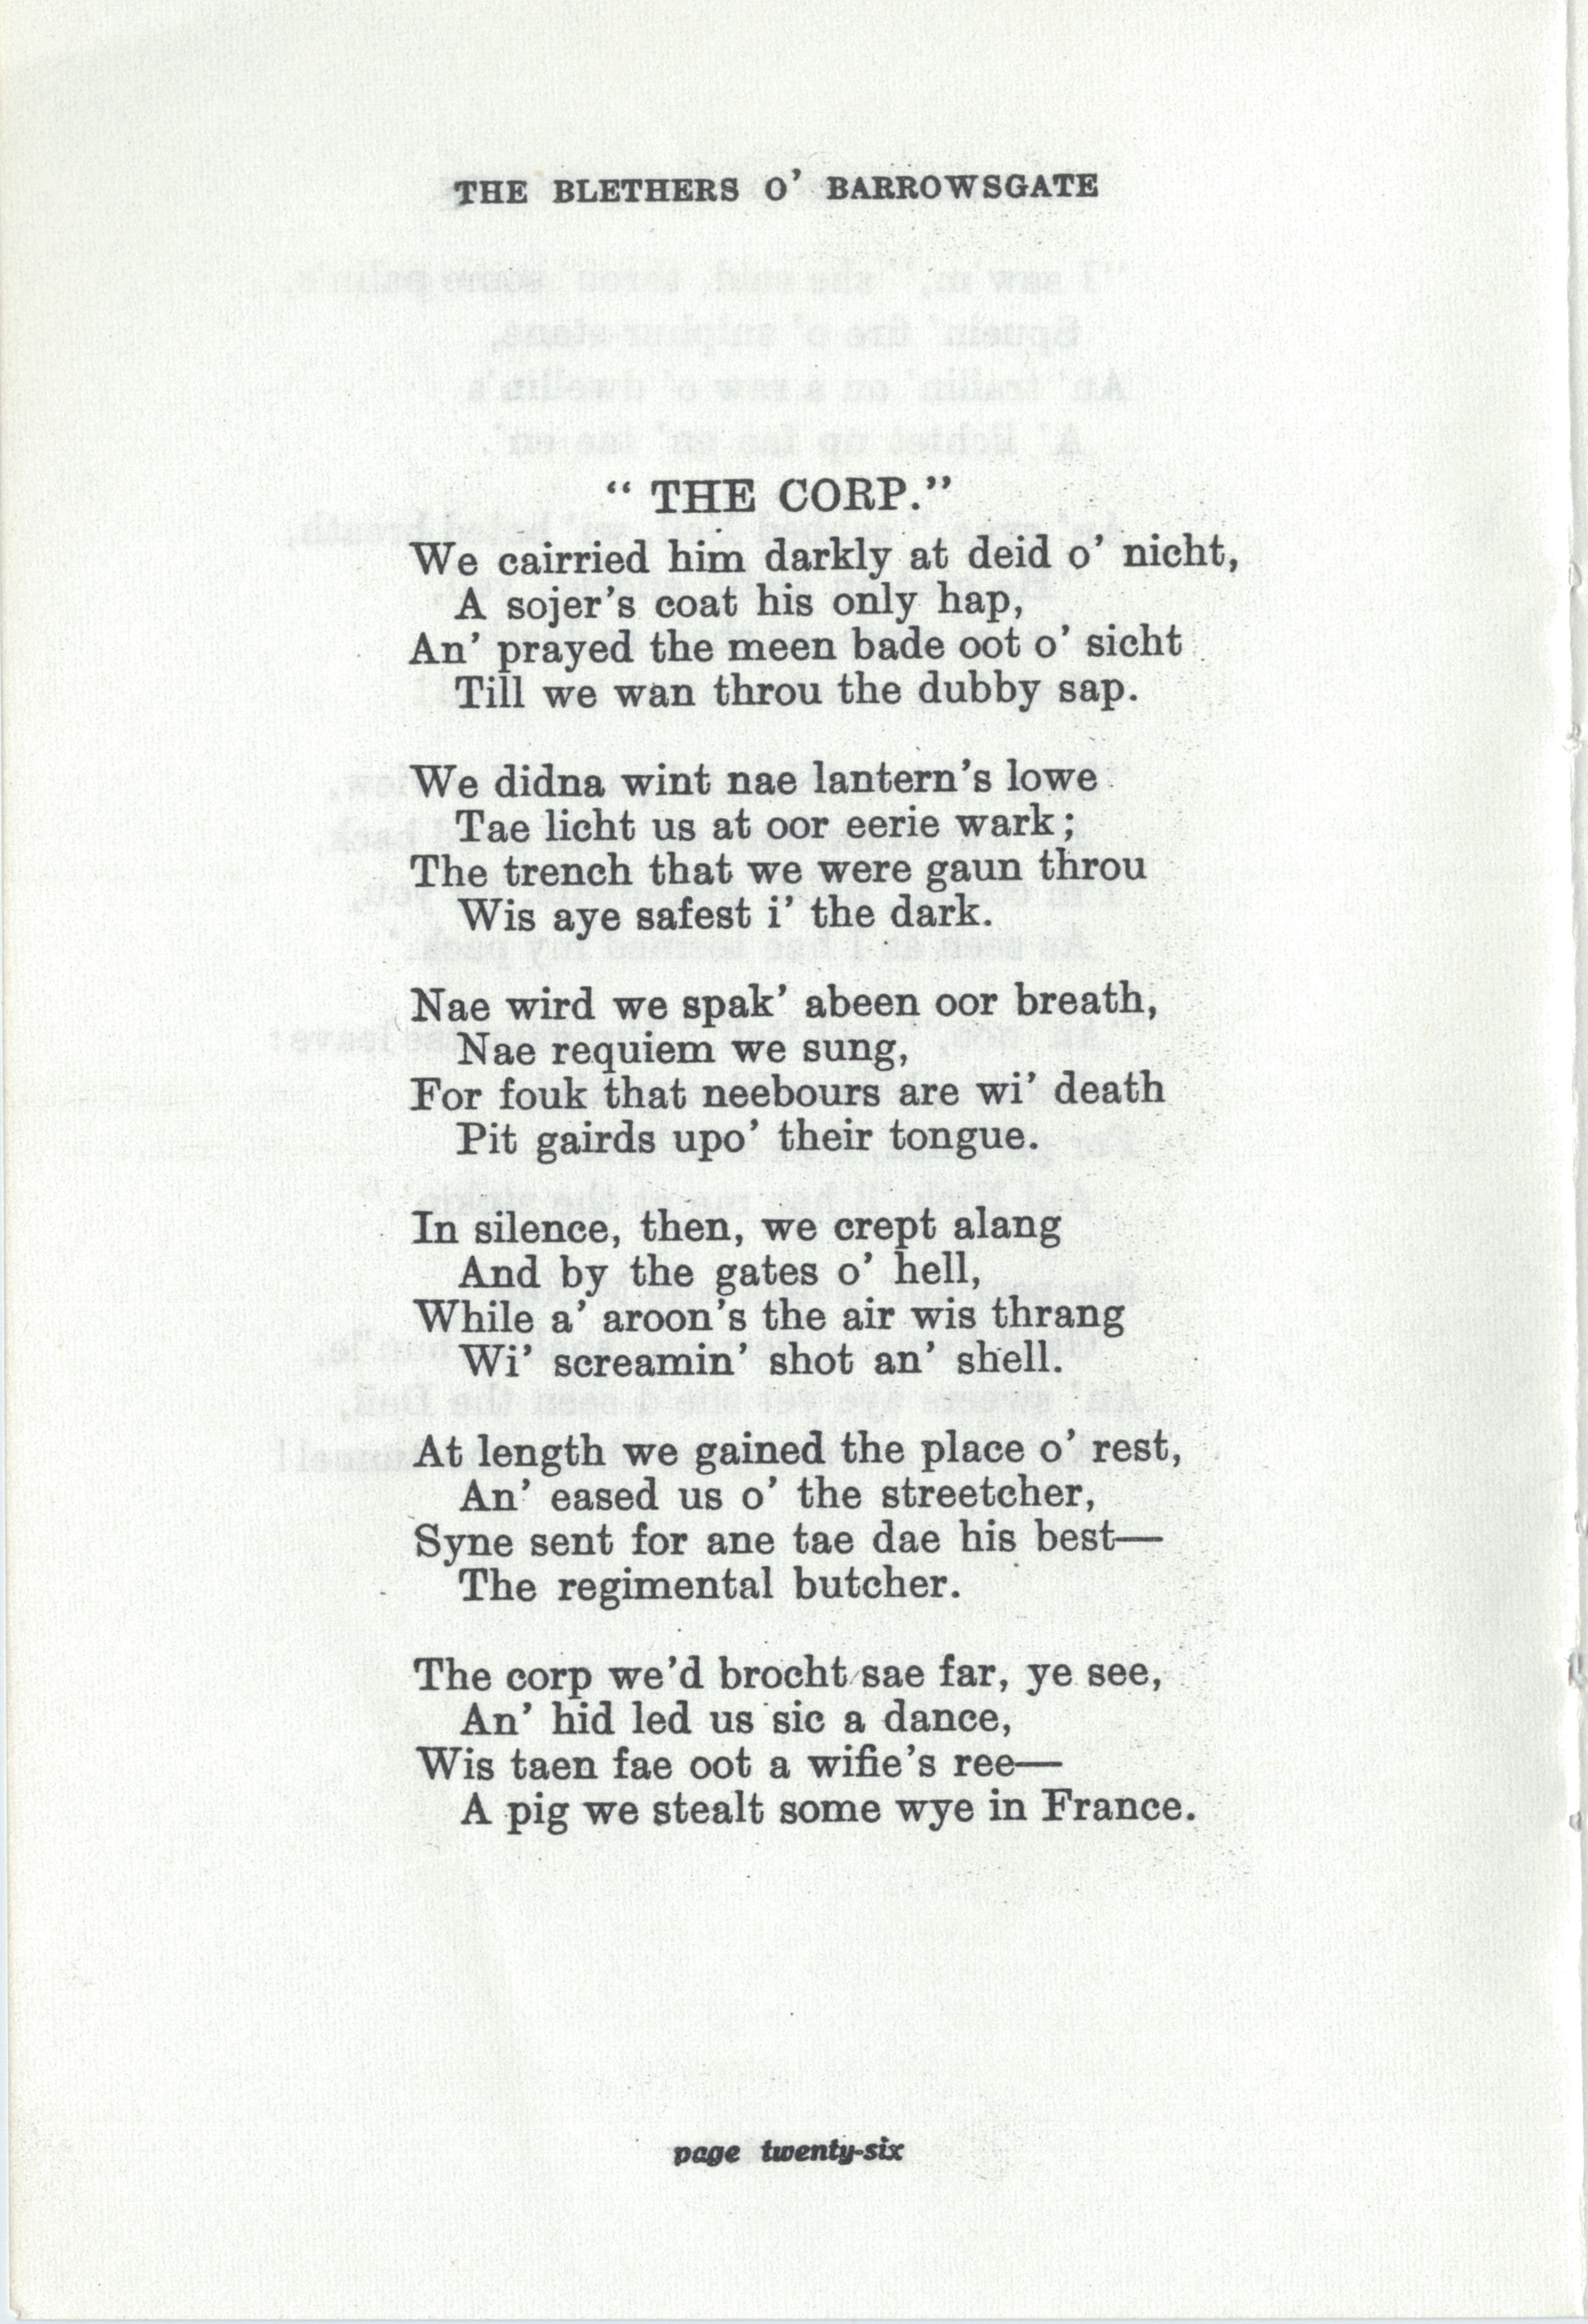
In “The History of the 10th Battalion AIF”, AH Limb recounted how, at one time in the forward areas of the Flanders frontline, two Australian soldiers evidently carrying the corpse of a mate on a stretcher were stopped by a curious officer. The officer, wishing to see the body, pulled back the groundsheet only to discover a dead pig. The funeral cortege was allowed to proceed to the cookhouse, where, to the delight of the men and the accompaniment of several pianos from nearby farmhouses, it was duly roasted and eaten. It is not known whether Jim was involved in this incident but, in 1933, he published the poem below as part of his “The Blethers O’ Barrowsgate” collection!
Ten days later, the 9th and 10th Battalions were ordered to take the village of Méteren (which was now on the front line after the German Spring Offensive) from the occupiers. Despite several attempts, the attack failed and 21 soldiers from the 10th Battalion were killed as well as 58 injured. Jim was one of those injured (24 April 1918).
James Hugh Smythe timeline (Spring 1918, Flanders)
Role/Rank: Infantryman – Lance Corporal
| Date | Location | Description |
| 12 April 1918 | Hondeghem Camp | Lance Corporal |
| 13 April 1918 | Hazebrouk | Trench warfare – 10th Battalion in support role |
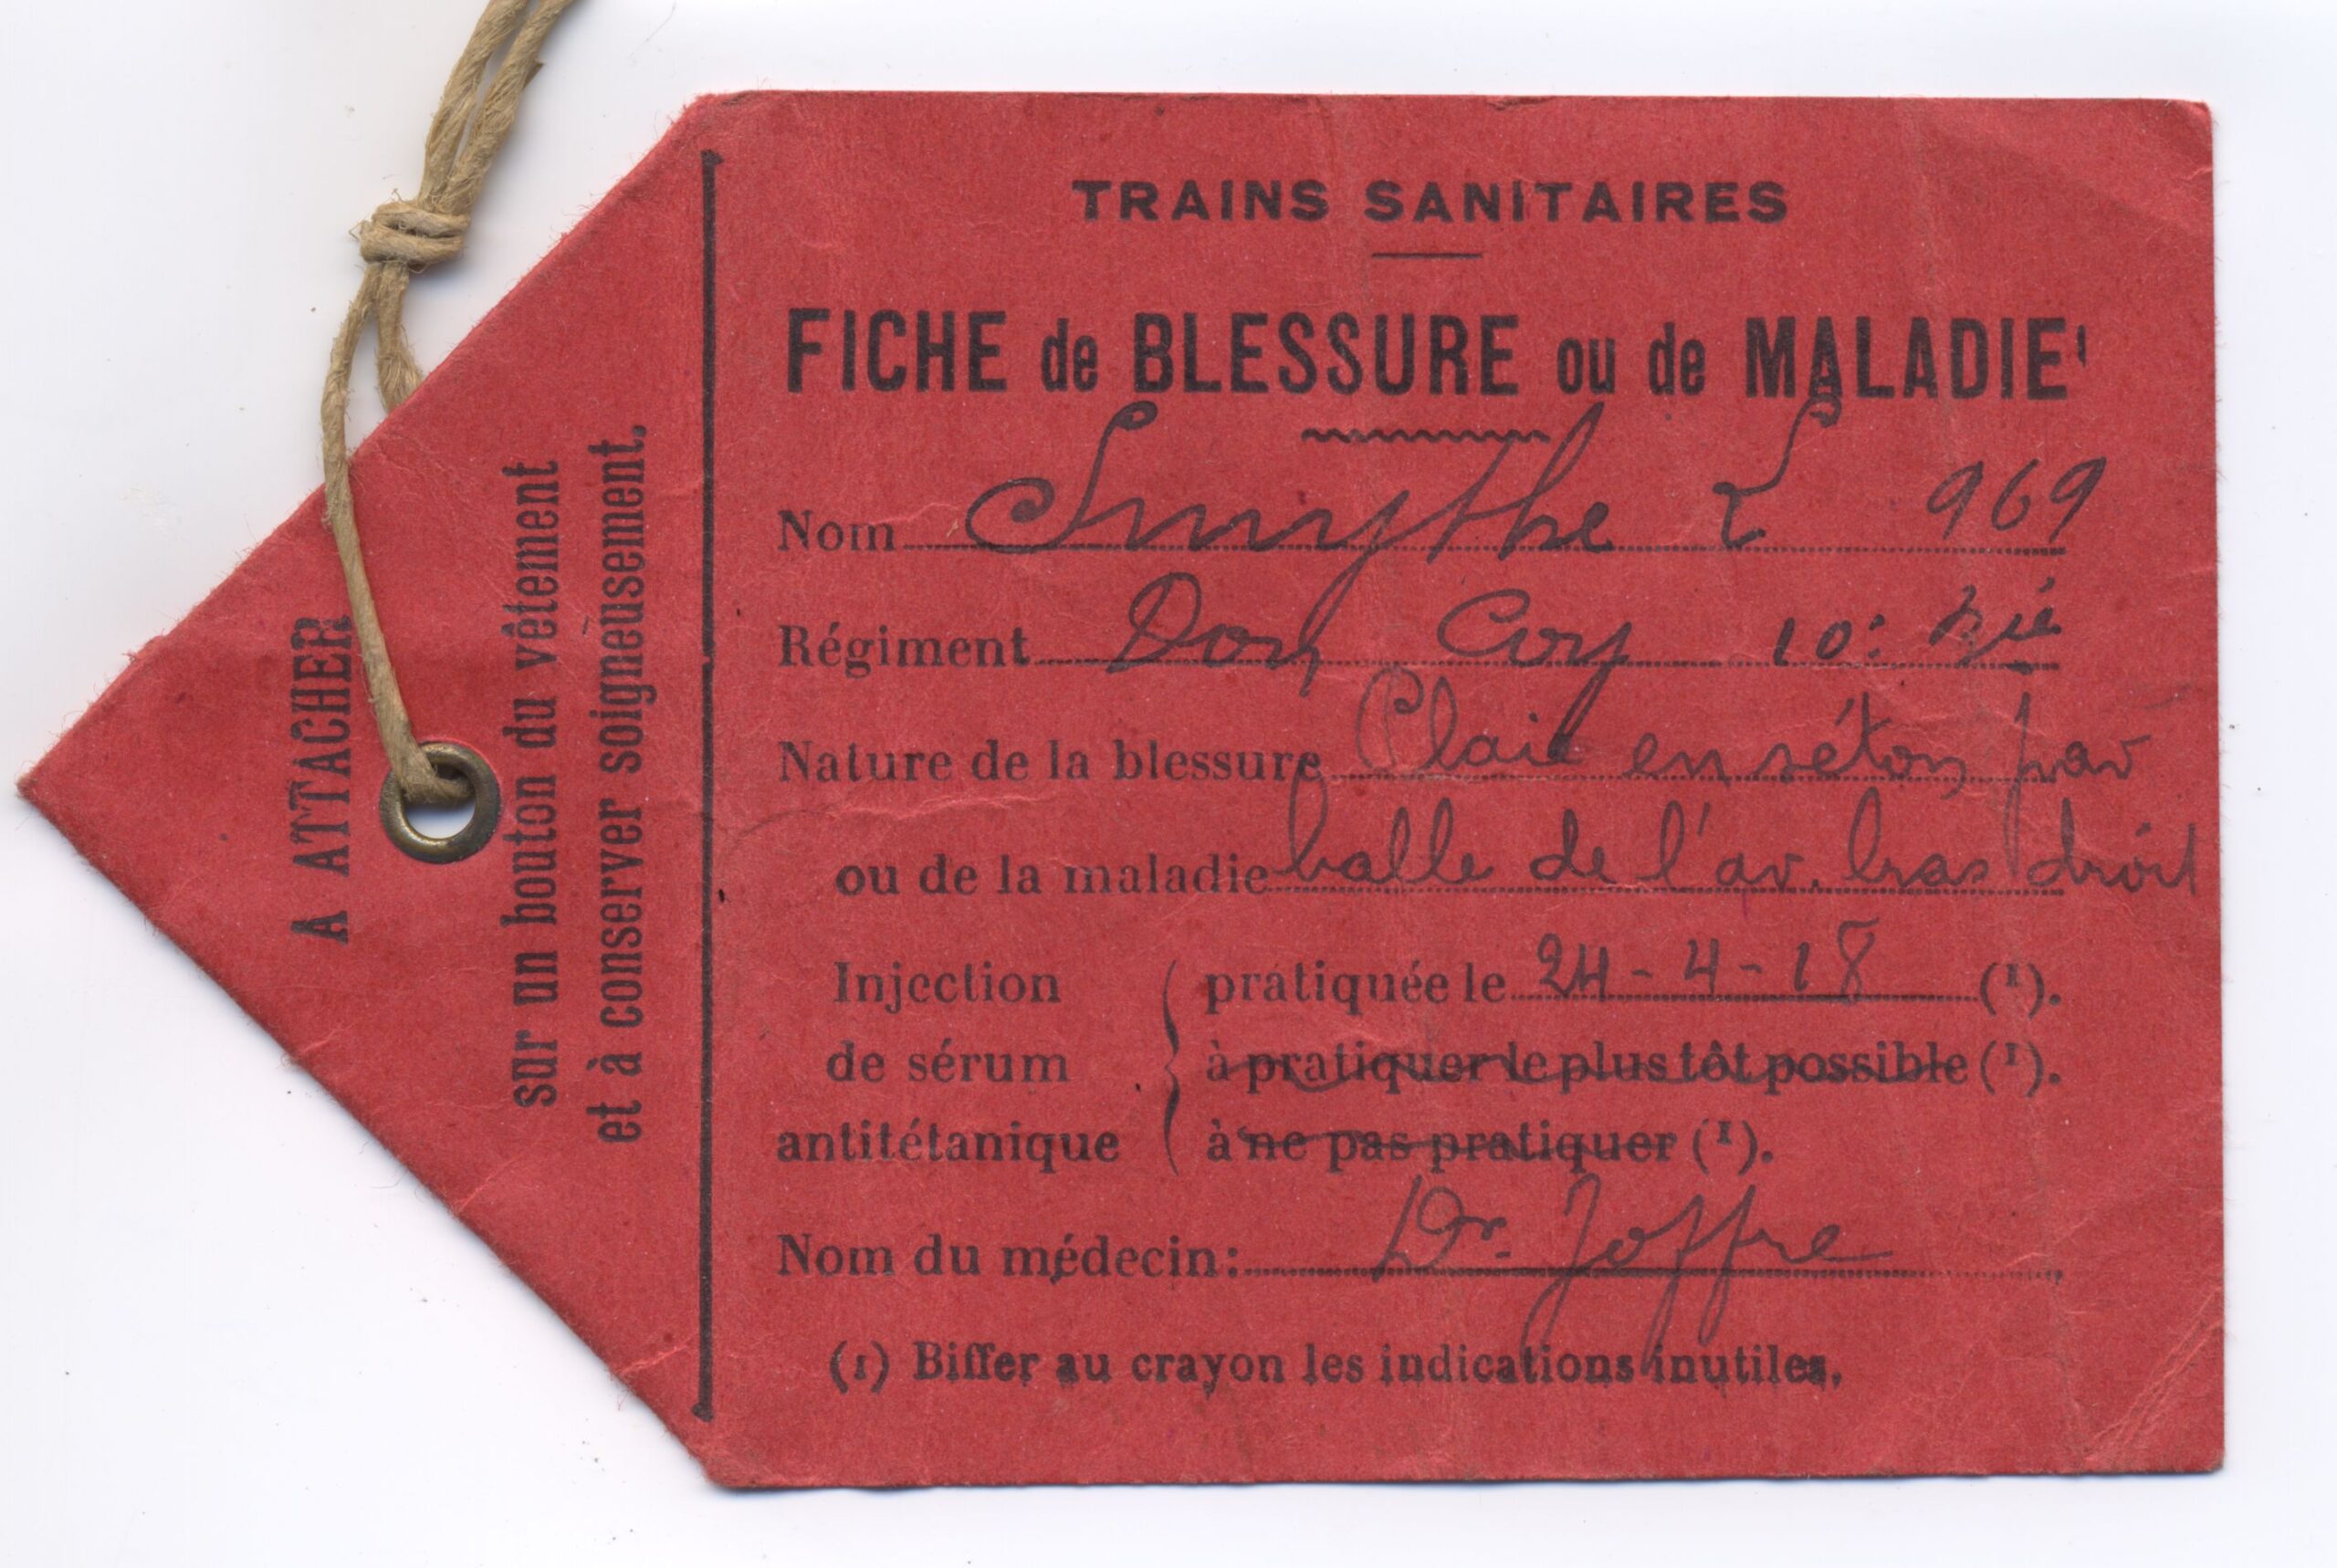
| 24 April 1918 | Méteren | Injured by machine gun fire (right wrist) |
Repatriation
On 25th April 1918, Jim was taken by train to 55th General Hospital on the outskirts of Boulogne. A machine gun bullet had entered though the inner styloid process of the right ulnar (i.e. the right wrist-joint) and come out the other side. As a serious injury, this resulted in his evacuation to England aboard SS Cambria on 28 April 1918 and he was then admitted to the Ontario Military Hospital in Orpington where he stayed for around a week. His next stop was the 3rd Australian Auxiliary Hospital in Dartford where he remained for a further ten days.
On 15 May 1918, Jim was discharged from hospital in Dartford and granted two weeks’ furlough after which he was to report to Hurdcott Camp, near Salisbury, where he remained from June to August. In 1918 Hurdcott Camp was a “Command Depot” run by the Australian Army. These were set up as a places where soldiers discharged from military hospitals could recuperate and then get ‘fighting fit’ again.
From Hurdcott, Jim proceeded to the military hospital in Weymouth, Dorset for an evaluation of his fitness. On 23 August 1918, he was graded as permanently unfit for “general service” and temporarily unfit for “home service”. Accordingly, Jim was repatriated to Australia. It is not clear from his service record, but Jim was probably allowed some leave of absence as he did not sail until 06 November 1918. If so, he would doubtless have returned to Scotland. He left Devonport Docks, Plymouth on HMAT Marathon, which arrived in Melbourne on 1 January 1919 and thence to Adelaide. After seven days’ leave, he was treated at Torrens Park Hospital, Adelaide, where the prognosis was that he would only have 75% of full capacity on returning to work.
On 9 June 1919, Jim was finally discharged from the AIF as “Medically Unfit” after four years and nine months’ service, aged 36 and awarded the Silver War Badge. The main purpose of the badge was to prevent men not in uniform and without apparent disability being thought of as shirkers.
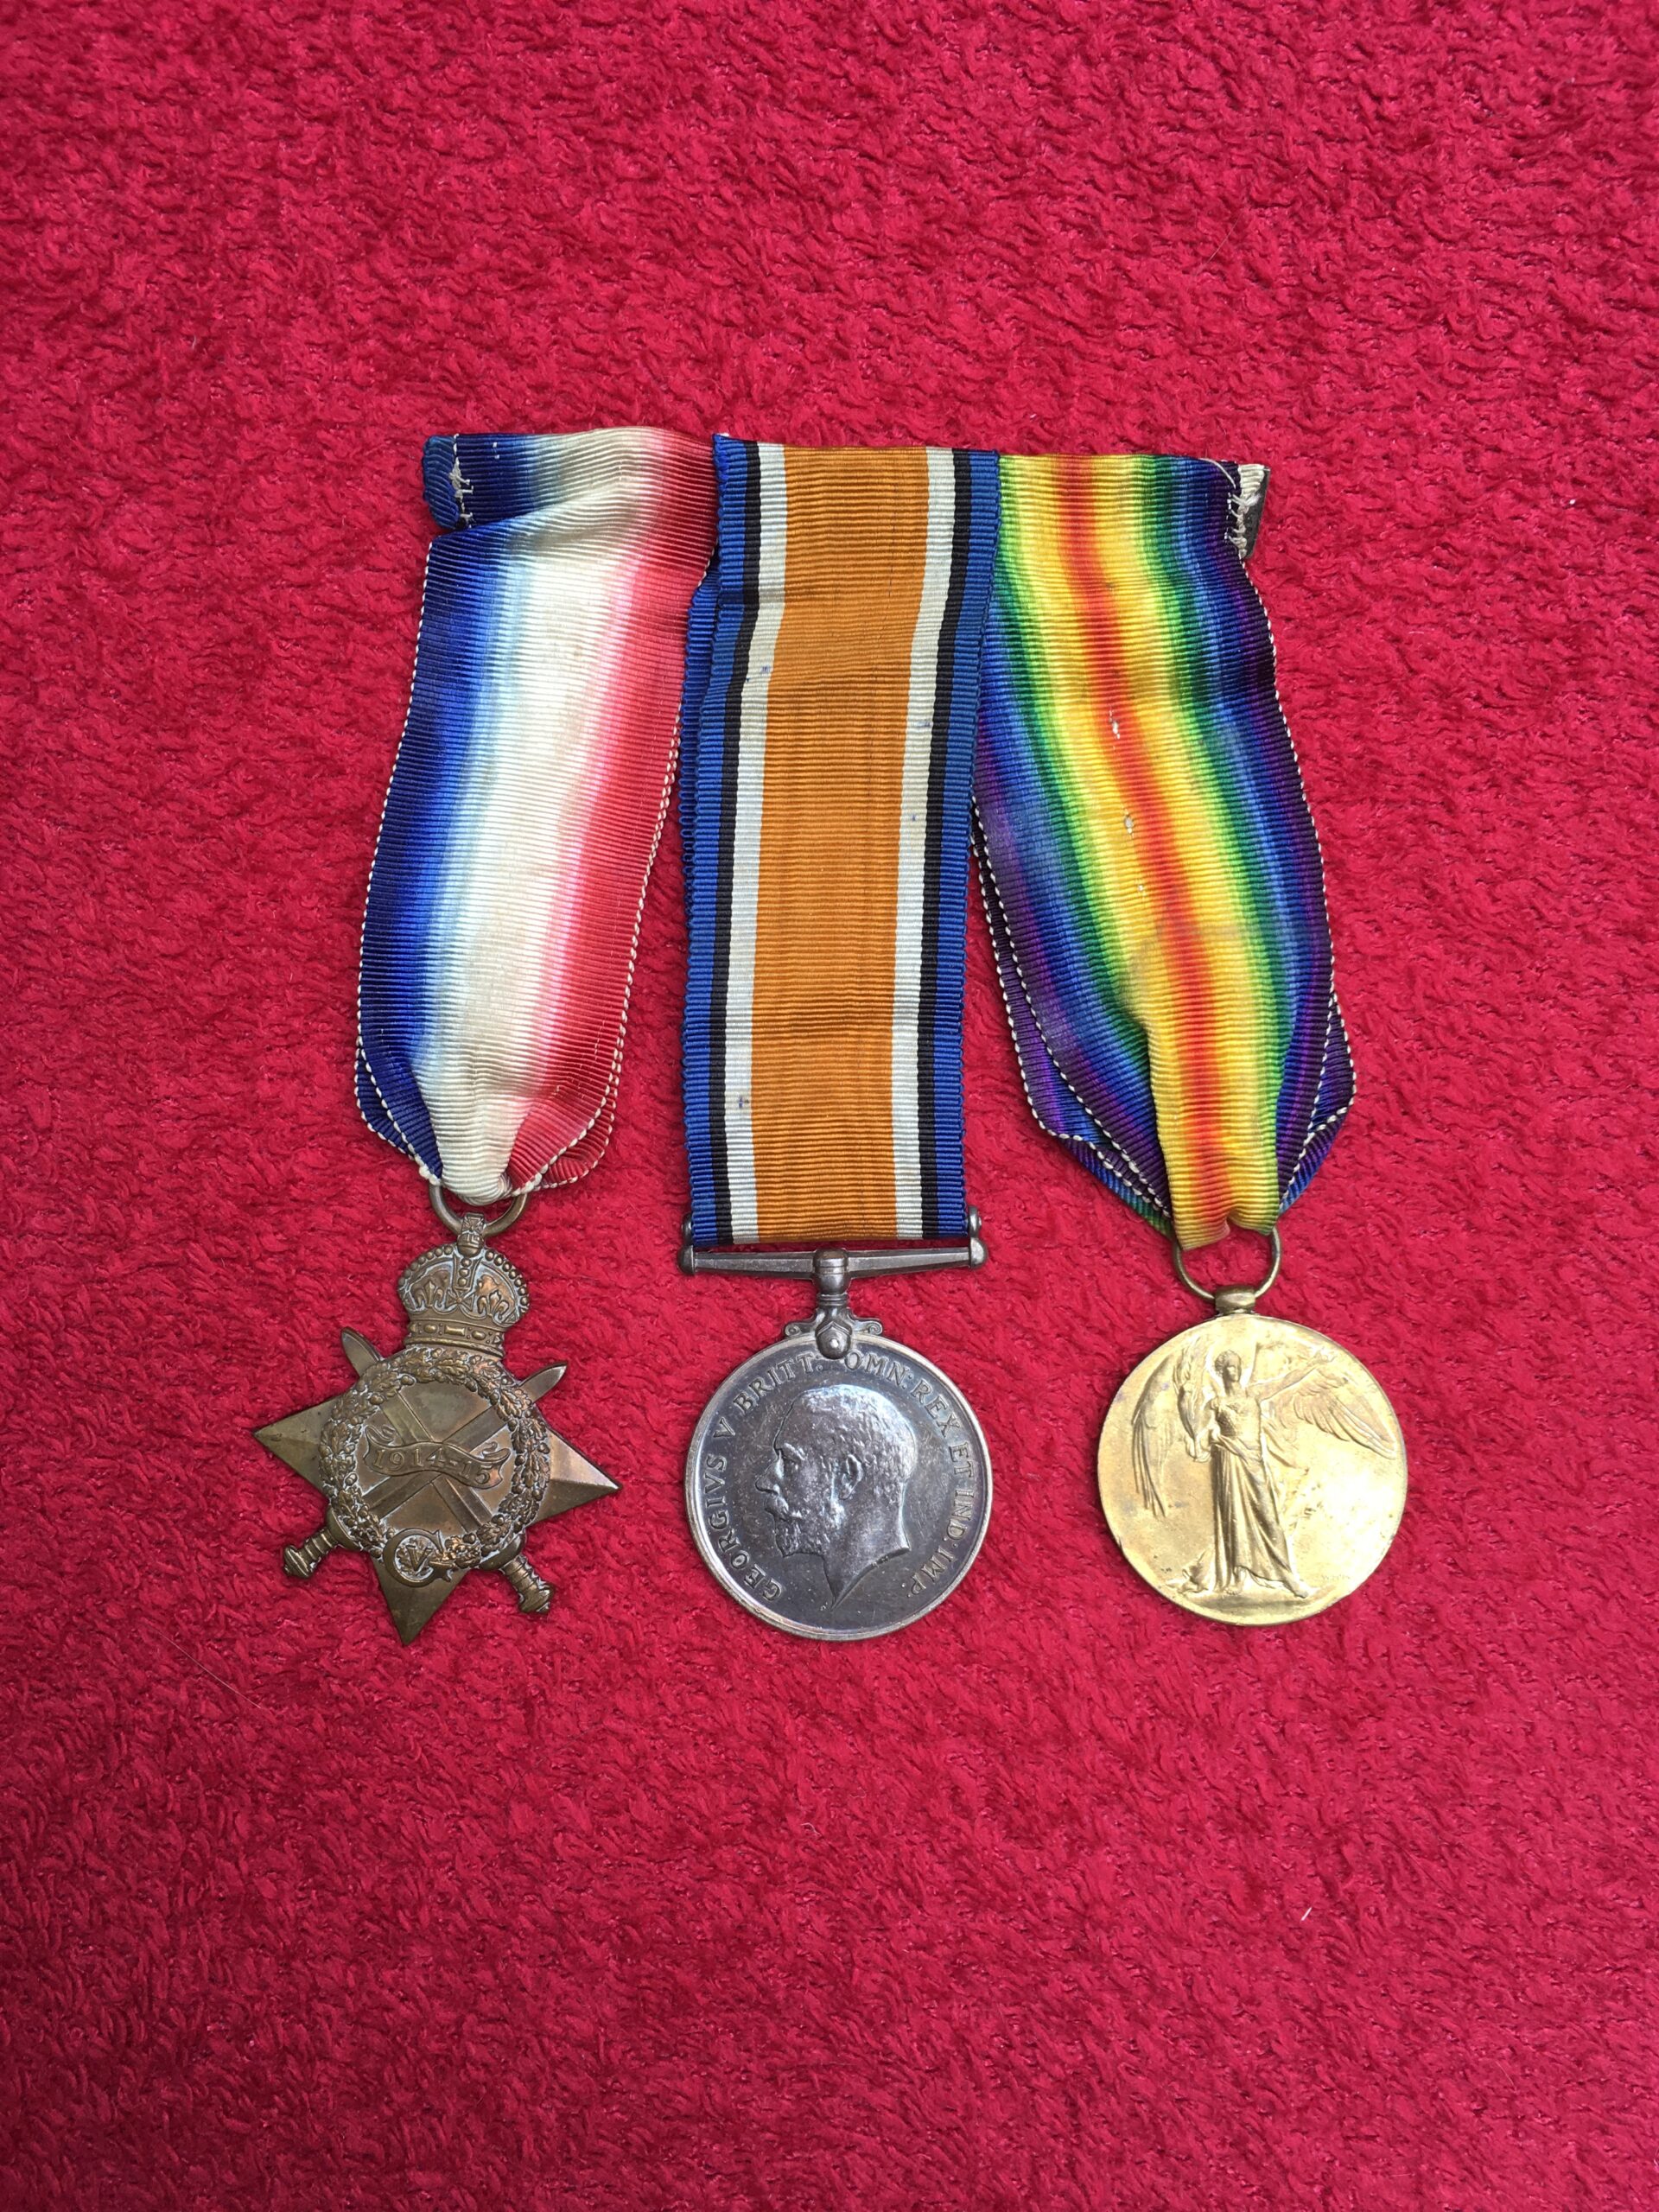
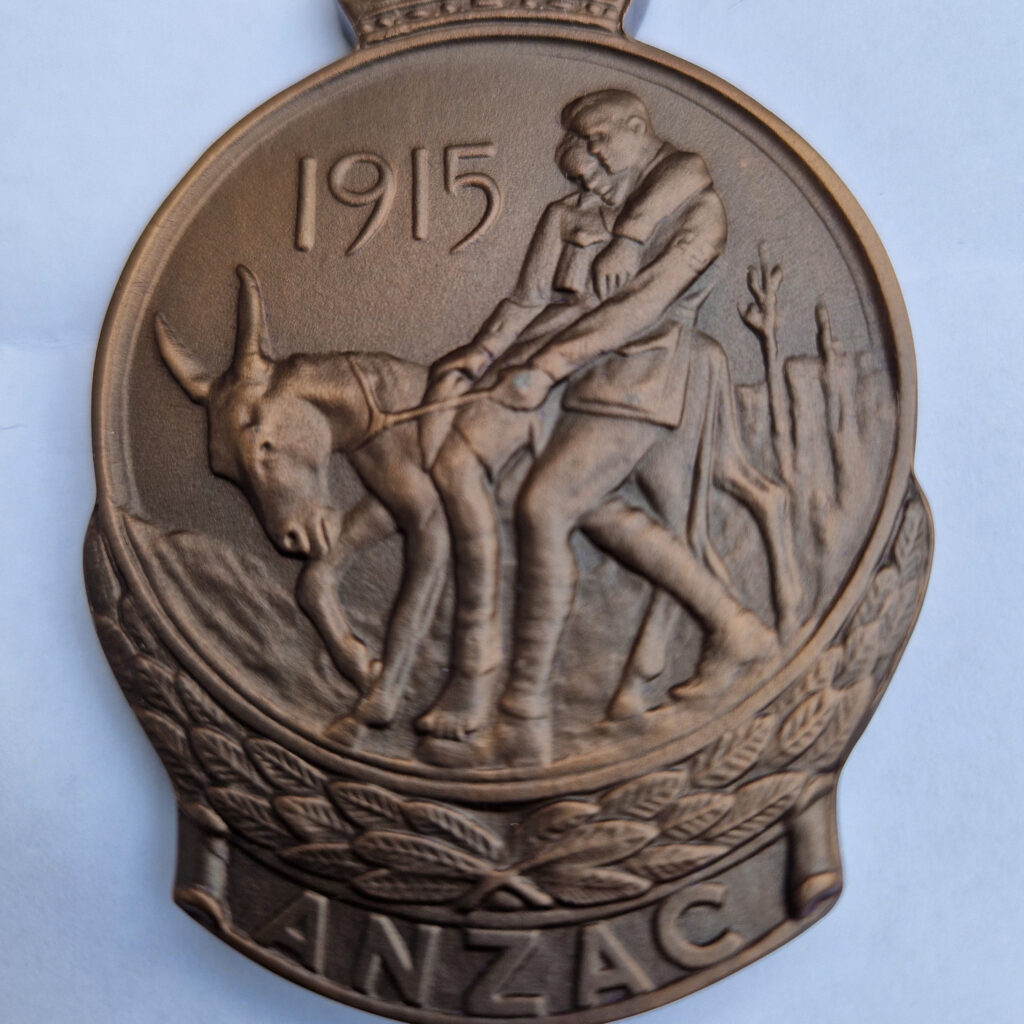
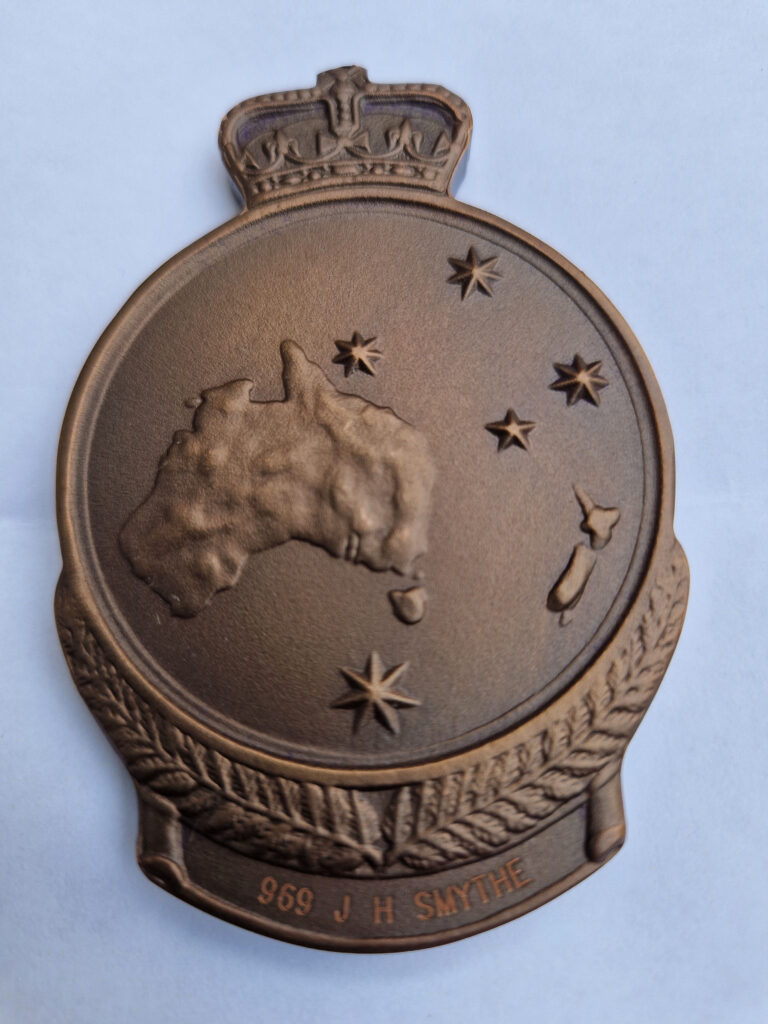
His disability entitled him to a limited Army pension. He was awarded all three WW1 Service medals: the 1914 Star, the British War Medal 1914-1920 and the Victory Medal 1914-1918. In 1967, the Australian Government introduced the Anzac Commemorative Medallion, to which Jim was posthumously entitled.
The 10th Battalion continued operations until late September 1918. At 11 am on 11 November 1918, the guns fell silent. In November 1918, members of the AIF began returning to Australia. At 8 am on 5 September 1919, the final detachment of the 10th Battalion arrived at Adelaide, aboard the transport Takada.
Of the seven “Pinnaroo boys” in the photo taken in Egypt, six survived the war, Percy Venning having died in combat at Gallipoli in 1915. Les Harding was the only one of the seven not to have been seriously wounded during the war.